I'd like to share with you my youtube channel.
Meanwhile I have three videos:
Making a handmade journal
Autumn Sale
Tucan Journal with Gilded Fleur de Lis
I hope you enjoy my videos!!
Thanks for watching!!
martes, 28 de octubre de 2014
lunes, 15 de septiembre de 2014
Martha Stewart Weddings: FEATURE!
Last year, when June was coming to an end, I got an email by one of the administrations of Etsy. Apparently, they wanted one of my journals to use in one of their "Real Weddings". I didn't know what to think. They told me seven days after that convo, the journal had to be in New York. Only seven days.
I asked whether it was sure that my journal would be used, or if they had several options. The admin didn't know.
You may say, why was she doubting? It was such a great opportunity. The reason is I would have to ship using FedEx, which would cost me about 60€, and I wasn't even sure whether they would feature it or not. It was not a good moment for my economy.
I don't know why I finally jumped in the pool. I made much more than they requested: I made the journal bigger to be used as a guestbook, I bought a cloth of a better quality and I added a case for it. Finally I shipped. And I never heard back.
The guestbook had to be featured on August-September, so I checked. But, have you ever been on that website? There are so many different weddings. Also, they had told me I would probably receive many visits and orders once the journal was featured. None of this happened, so I assumed it was never used. And, yes, I felt disappointed.
But some weeks ago, someone wrote to me asking for the journal she had seen featured. And then I saw. It had been used. It had. I couldn't believe it. Actually, they added a wood frame and it looked amazing, but it was MY JOURNAL.
All of this is just to share with you the feature Martha Stewart made of my journal:

Thanks for looking!!!
PS: According to Etsy, during the last 12 months only 12 people came to my shop from Martha Stewart's website.
jueves, 4 de septiembre de 2014
Journal Review
Joe from Seattle bought a journal from me this August from Fountain Pen Network and he made a review in his wife's blog. You can read it here: http://penfatness.blogspot.mx/2014/09/i-didnt-need-it-but-then-i-did.html
lunes, 28 de julio de 2014
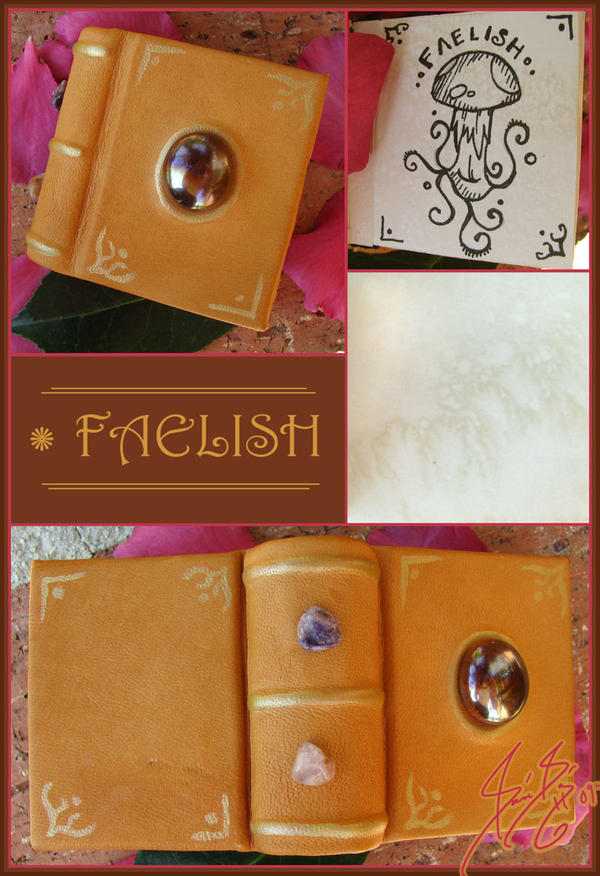
Making a Linsktitch Journal
Hello everybody!
Today I will show you how I make a linkstitch journal.
First, I have cut the papers into a size that suits me. The leather is cut allowing a 2 mm margin. I used my hot stamping machine to make some gilding on the leather. Also, you can see the pattern for the holes.

Then we have to make the holes in the leather using an awl...

... and, with the same awl, we make the holes in the signatures.

Everything is ready for the sewing.

Finally, I attached the closing strap.

And a little collage with the final work.

Thanks for reading!!!
Today I will show you how I make a linkstitch journal.
First, I have cut the papers into a size that suits me. The leather is cut allowing a 2 mm margin. I used my hot stamping machine to make some gilding on the leather. Also, you can see the pattern for the holes.
Then we have to make the holes in the leather using an awl...
... and, with the same awl, we make the holes in the signatures.
Everything is ready for the sewing.
Finally, I attached the closing strap.
And a little collage with the final work.
Thanks for reading!!!
lunes, 21 de julio de 2014
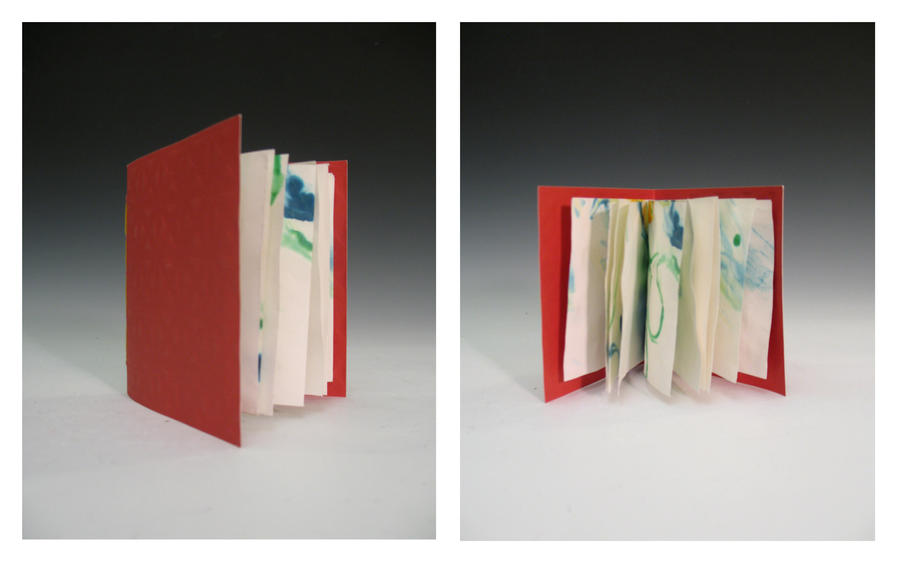
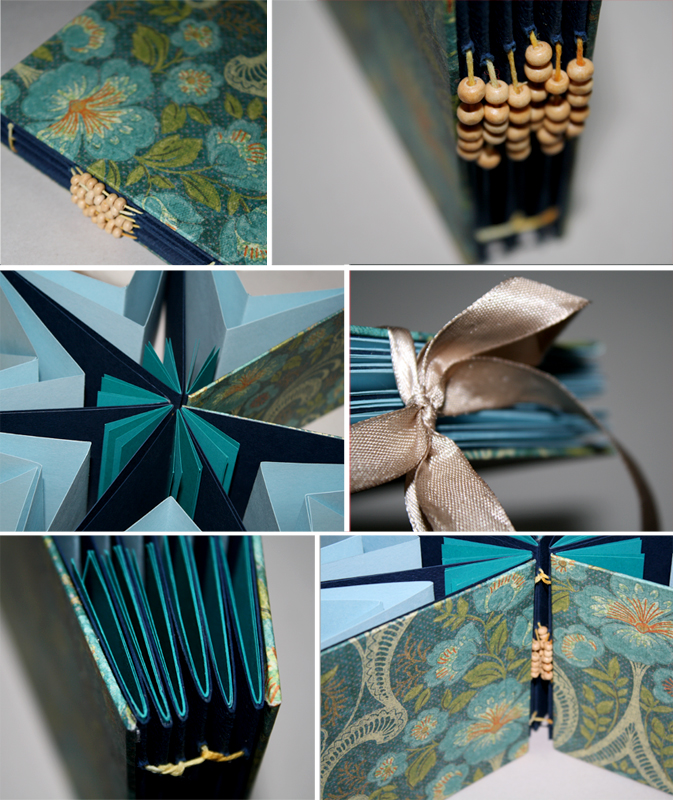
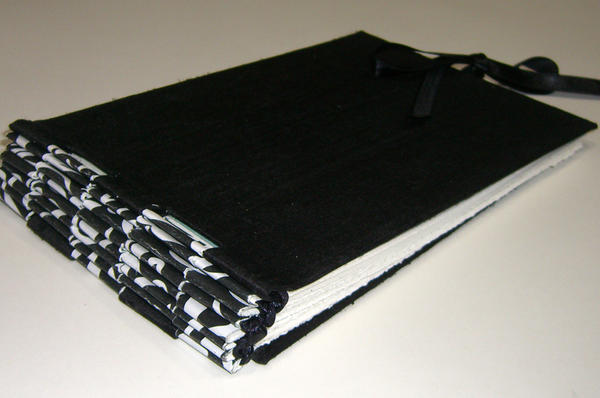
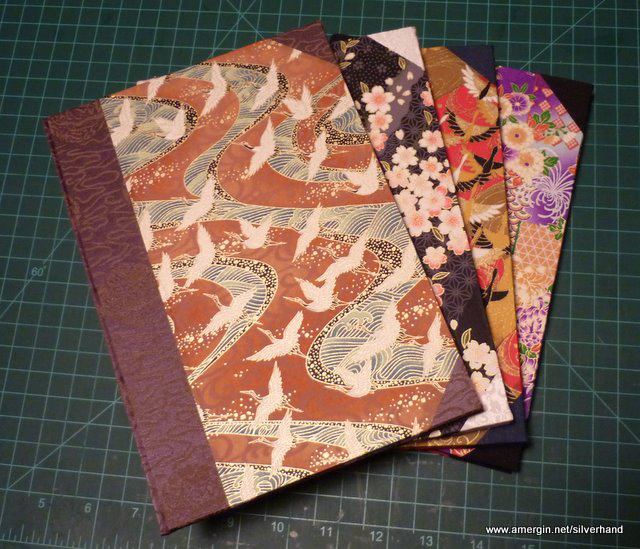
Celtic Braid Journal
Hi!!
As a bookbinder I realize there are so many different styles out there in the world. For this reason, I introduced Creative Friday. In these Fridays I try things I have never done before.
Today I'd like to show you the results of last weeks Creative Friday: Celtic braid journal. I used a tutorial by Manuel Valero which can be found here: http://reinoartesanal.blogspot.com.es/2014/02/variacion-del-trenzado-celta.html . I only made a braid, unlike Manuel, who made two. The tutorial is in Spanish, however, Manuel takes many, many pictures so even if you don't know Spanish I am sure you can follow with just the photos.
First, the signatures with the covers I made. I blind printed an arabesc on the cover. Also, you can see my book of tutorials. I printed all of Valero's tutorials and bound them to check them every now and then, since I don't have my computer on my workshop and it would be very annoying to go upstairs-downstairs everytime I wanted to check the next step.

Then you can see the covers with the papers and the holes. Everything ready to sew! I went fast for all the cover making process, because it is the same everytime and the interesting part, for me, was the sewing.

First step of sewing.

Half sewing.
 And the final results.


I am not entirely happy with the results. The binding is quite weak, specially in the last signature, but I think it can be solved in the future. I also think the braid might have looked better if there had been a longer separation between the points, noted reference for the future.
Thanks for reading!!
Today I'd like to show you the results of last weeks Creative Friday: Celtic braid journal. I used a tutorial by Manuel Valero which can be found here: http://reinoartesanal.blogspot.com.es/2014/02/variacion-del-trenzado-celta.html . I only made a braid, unlike Manuel, who made two. The tutorial is in Spanish, however, Manuel takes many, many pictures so even if you don't know Spanish I am sure you can follow with just the photos.
First, the signatures with the covers I made. I blind printed an arabesc on the cover. Also, you can see my book of tutorials. I printed all of Valero's tutorials and bound them to check them every now and then, since I don't have my computer on my workshop and it would be very annoying to go upstairs-downstairs everytime I wanted to check the next step.
Then you can see the covers with the papers and the holes. Everything ready to sew! I went fast for all the cover making process, because it is the same everytime and the interesting part, for me, was the sewing.
First step of sewing.
Half sewing.
I am not entirely happy with the results. The binding is quite weak, specially in the last signature, but I think it can be solved in the future. I also think the braid might have looked better if there had been a longer separation between the points, noted reference for the future.
Thanks for reading!!
Anna J. Bach
martes, 8 de julio de 2014
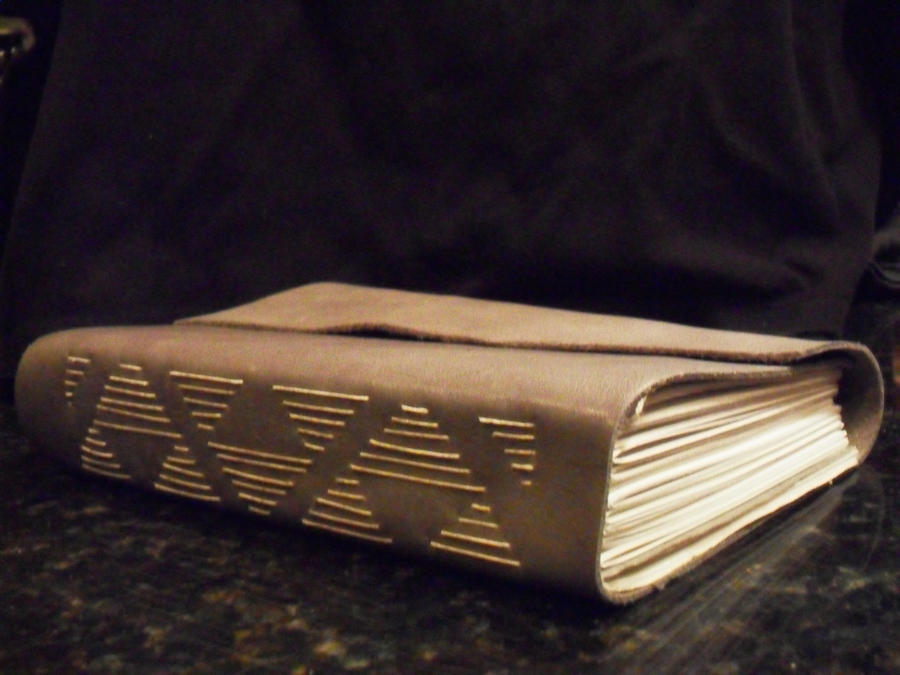
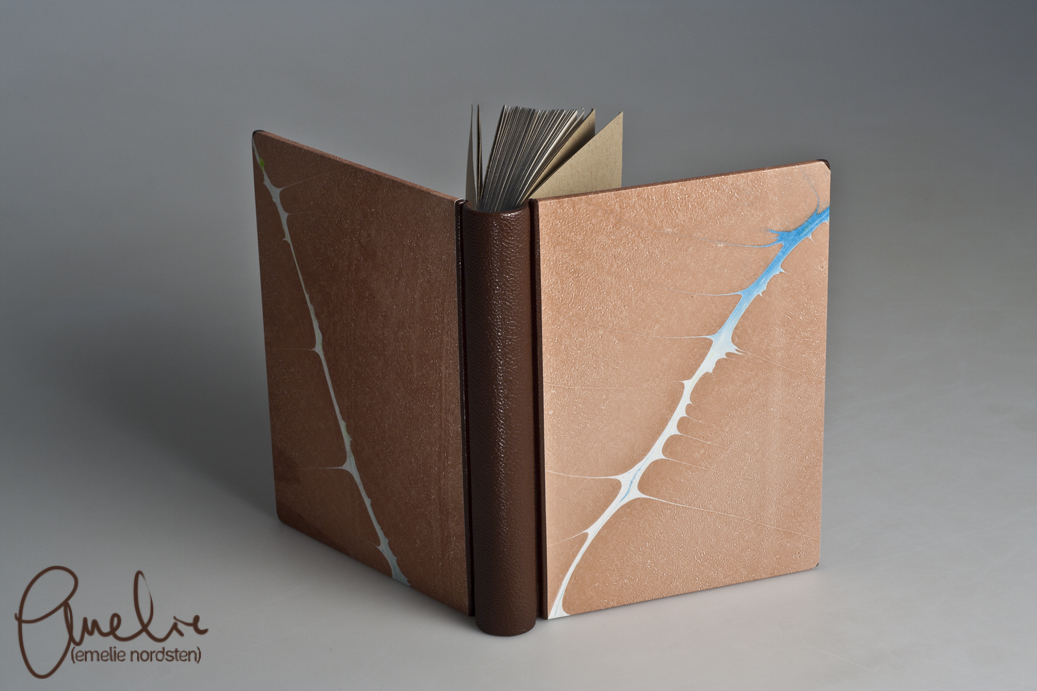
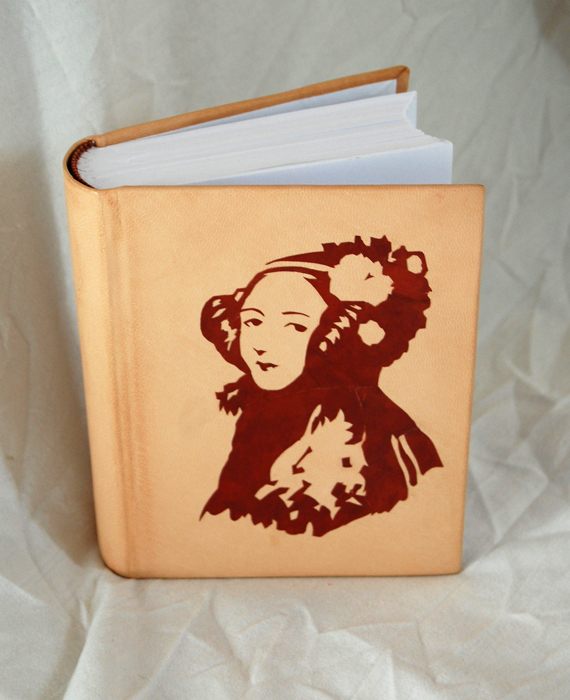
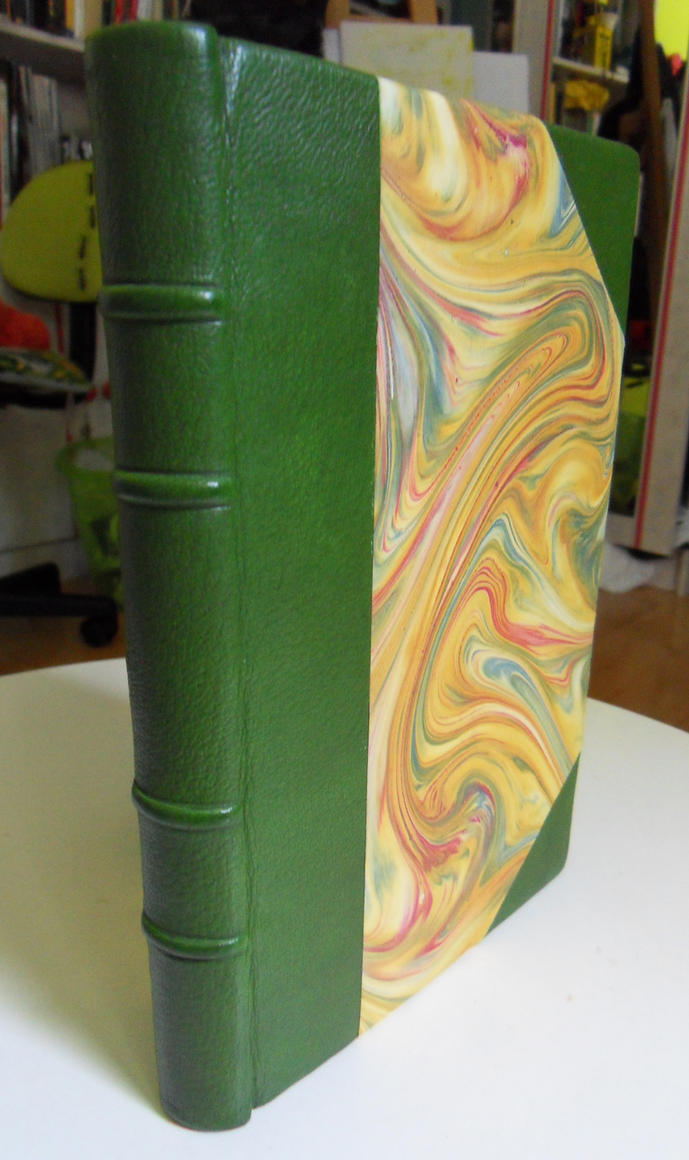
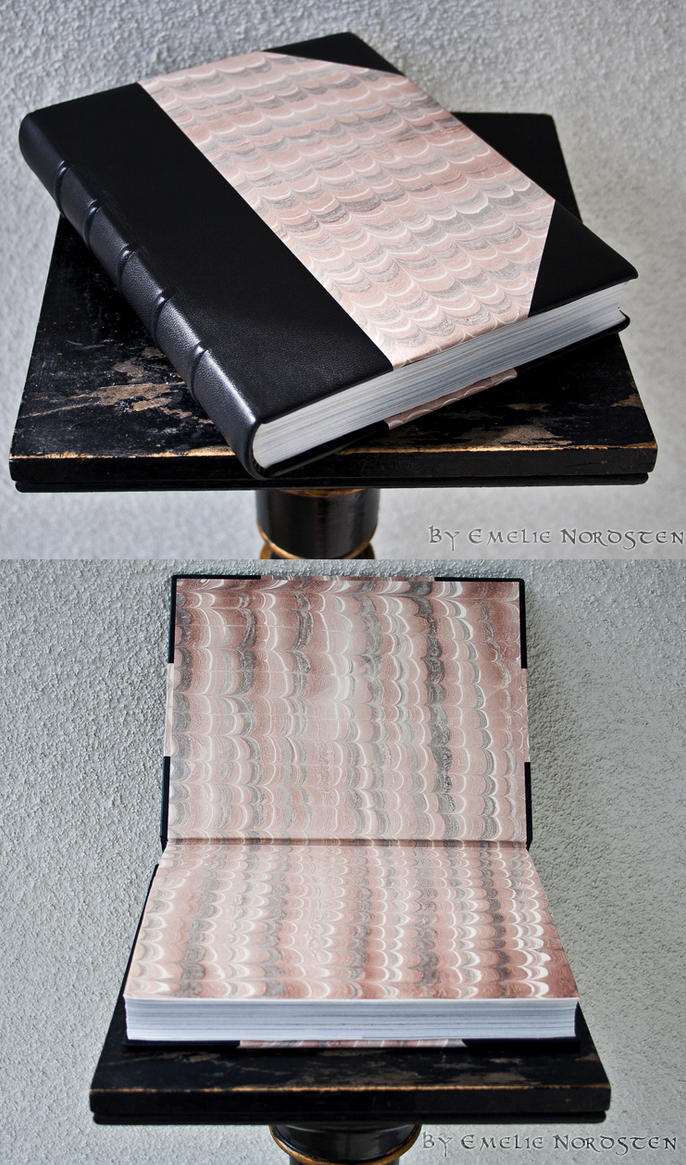
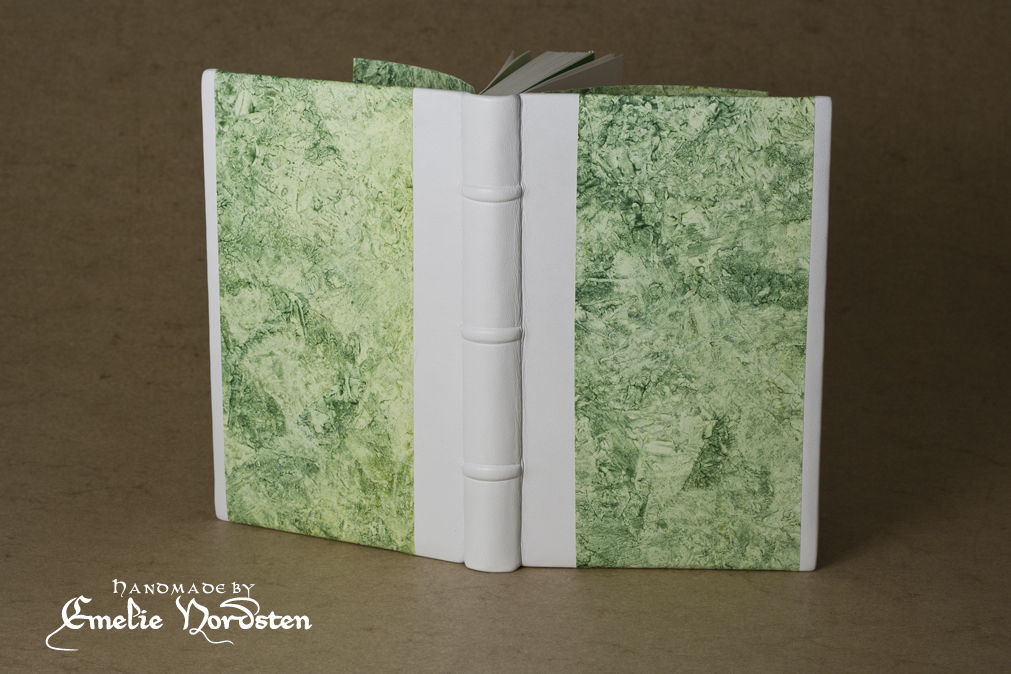
Ethiopian Journal in Leather
Hi!
I'd like to share with you an Ethiopian journal I made. First, a work in progress photo of the journal before the leather:

And now, the results:


For the inside covers I used some marbled paper that I made some time ago:


And the best part is that it opens extremely well!!

I am quite happy with the results :D.
I'd like to share with you an Ethiopian journal I made. First, a work in progress photo of the journal before the leather:
And now, the results:
The nerves are marked in the spine:
And the best part is that it opens extremely well!!
I am quite happy with the results :D.
jueves, 3 de julio de 2014
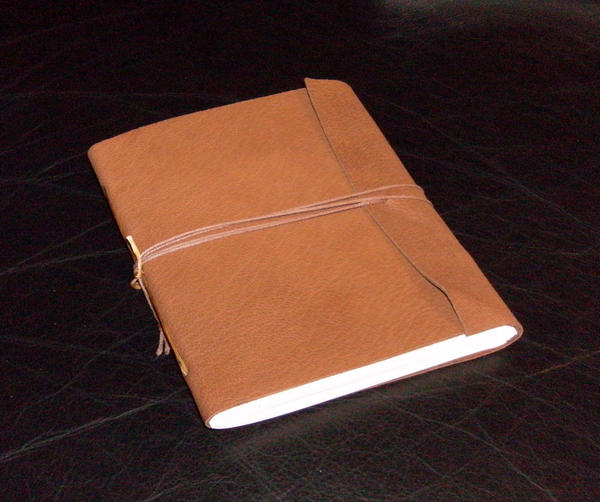
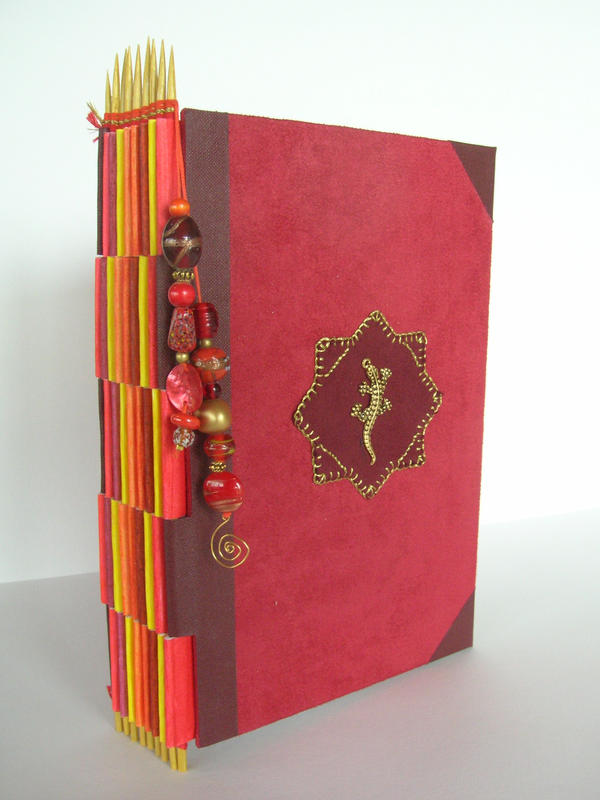
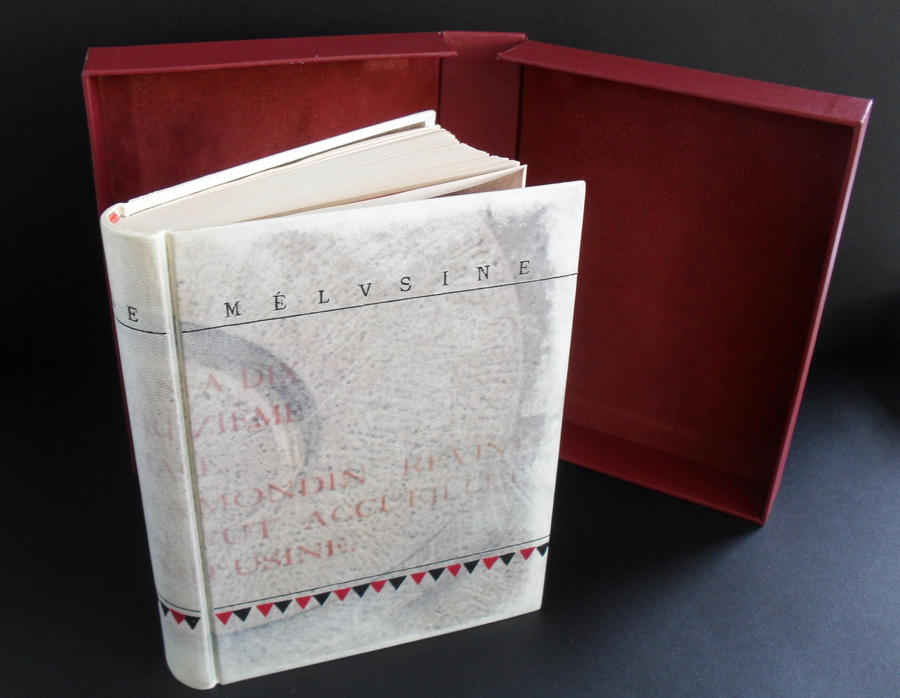
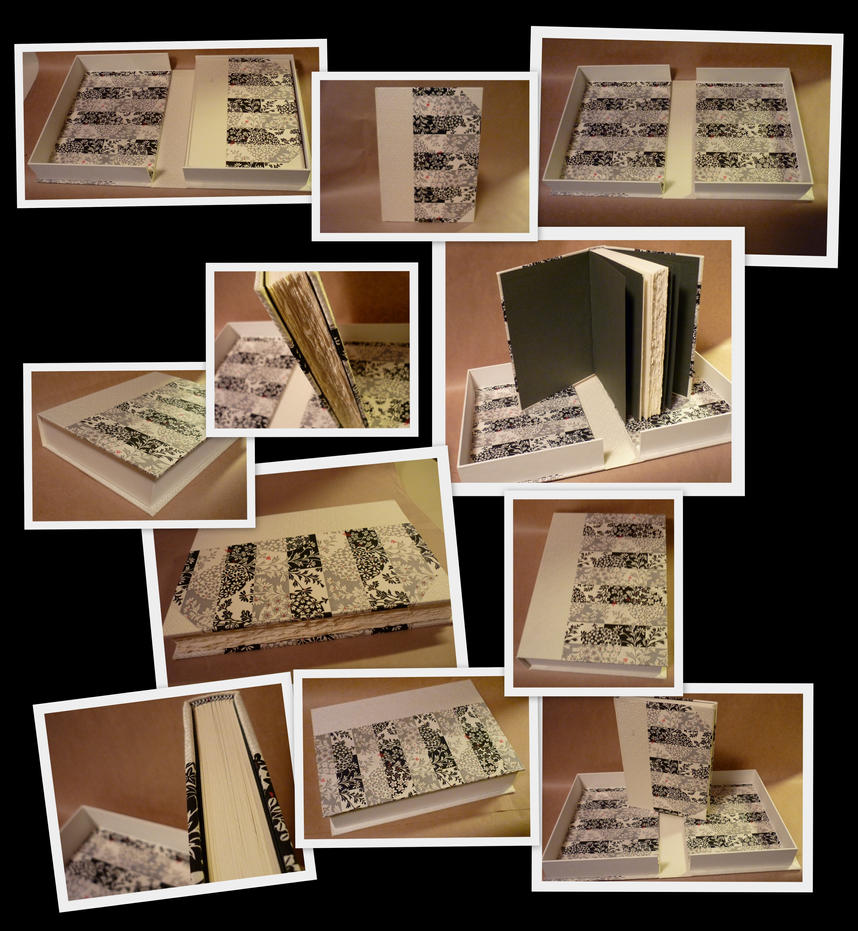
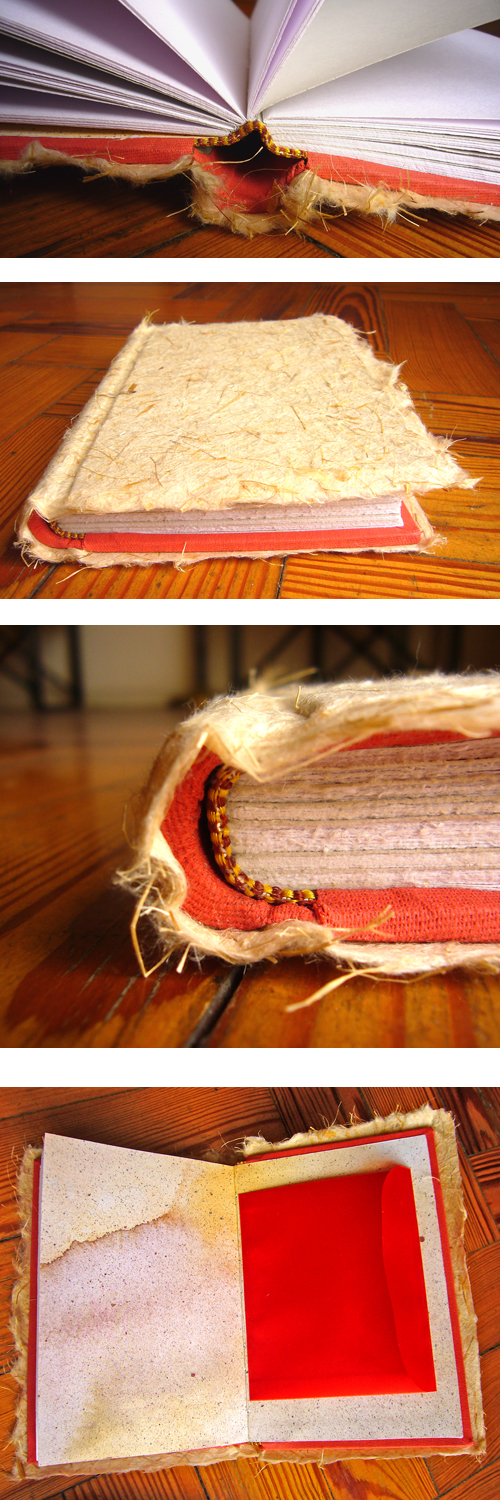
Journal in Red Leather with Case
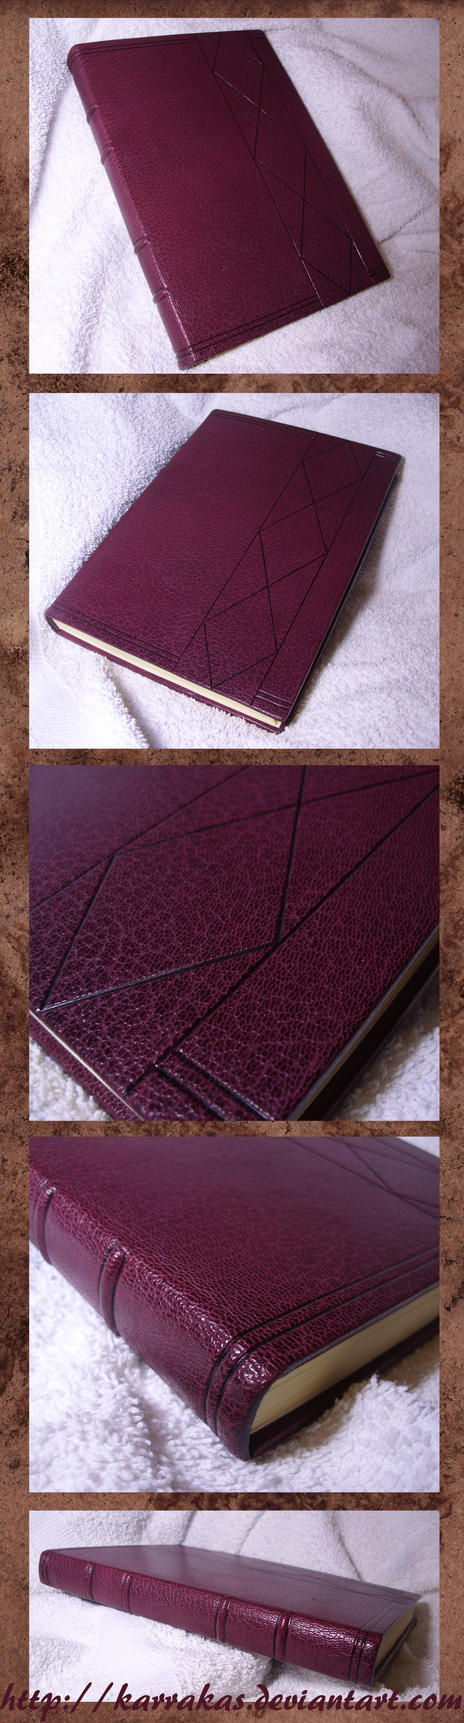
In this post I want to show you a journal I made this year.
First, some images of the journal in its making off. In this one, you can see the journal with its covers and its spine, waiting for the fake nerves to be put on.

In this one, the nerves are on, and the leather is ready to be glued on the journal.

Here, the box is being covered by the red cloth. Actually, I used two different systems. Here I am showing one, even though I prefer the second one I used, and is the one I am currently using in similar boxes.


First, some images of the journal in its making off. In this one, you can see the journal with its covers and its spine, waiting for the fake nerves to be put on.
In this one, the nerves are on, and the leather is ready to be glued on the journal.
Here, the box is being covered by the red cloth. Actually, I used two different systems. Here I am showing one, even though I prefer the second one I used, and is the one I am currently using in similar boxes.
And the two boxes, showing the different systems used.
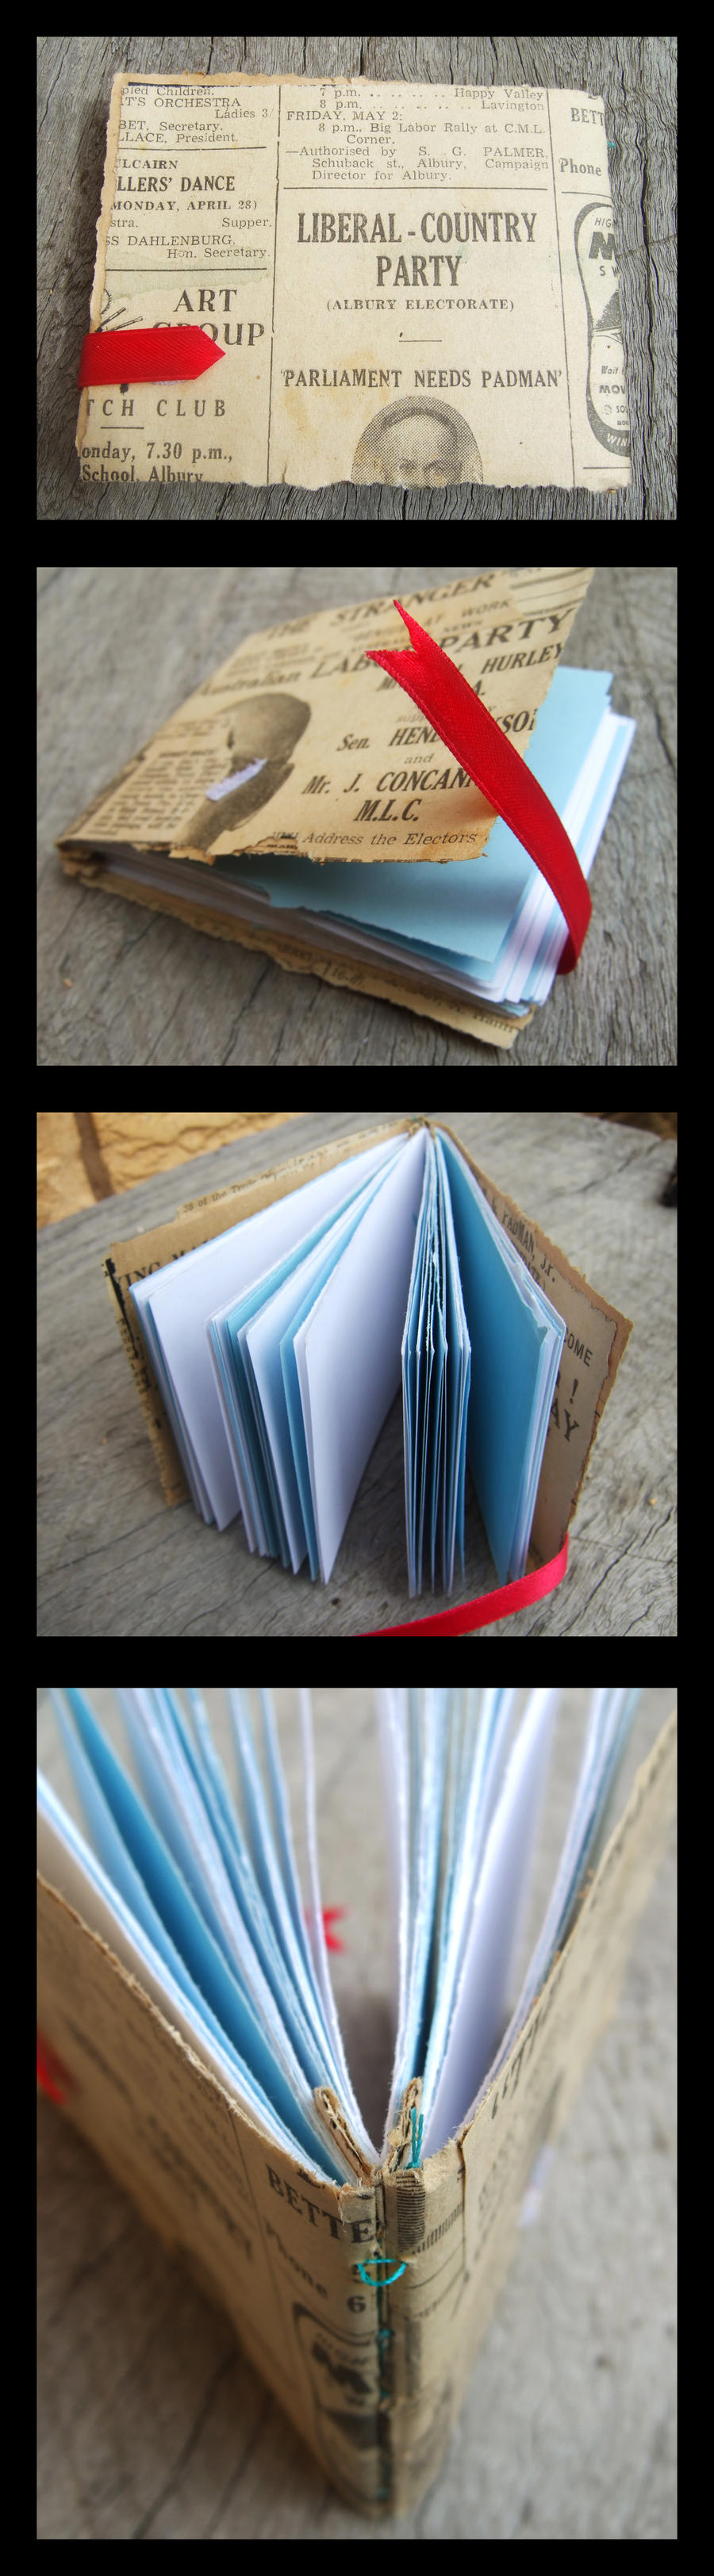
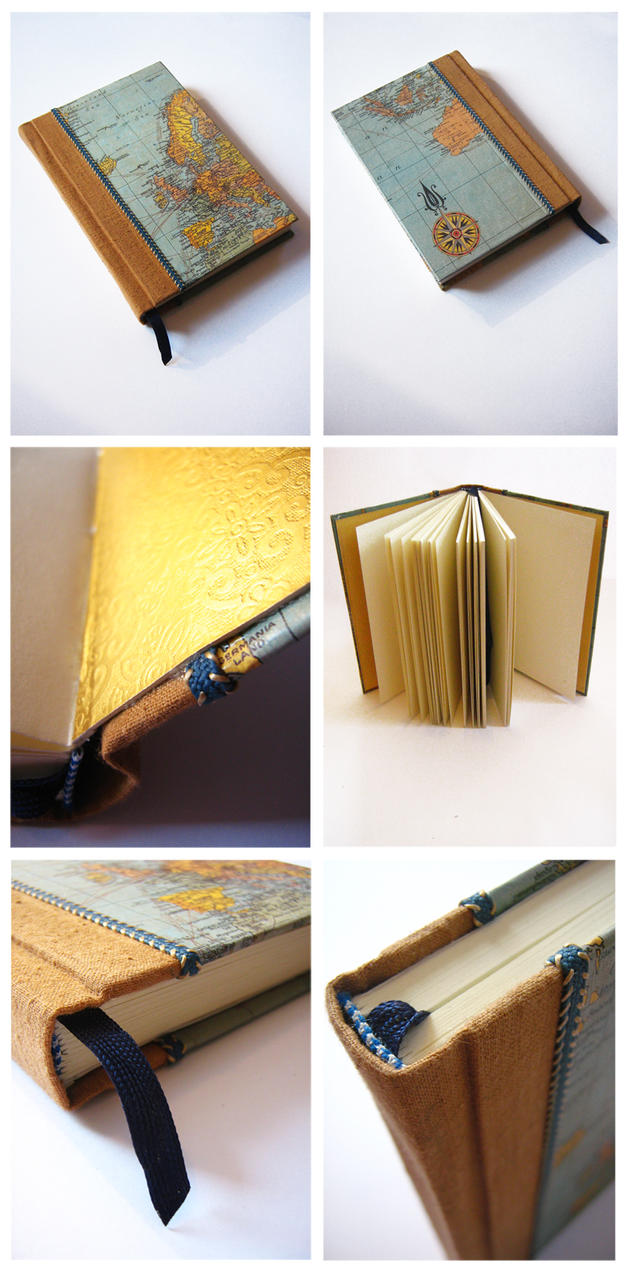
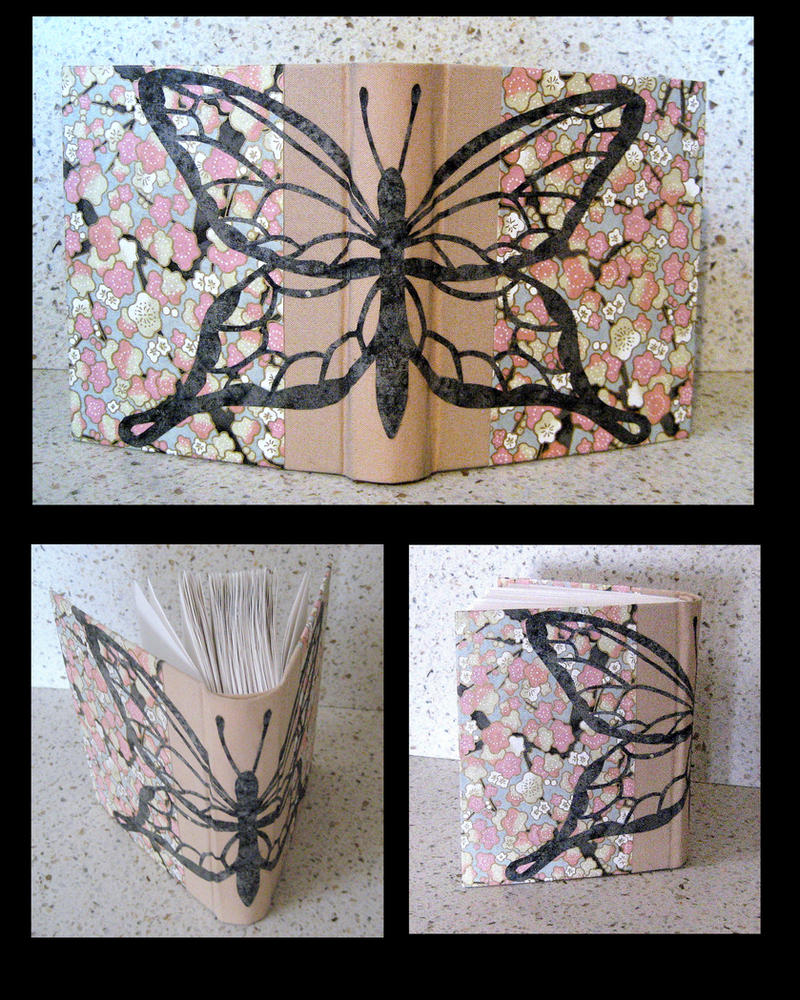
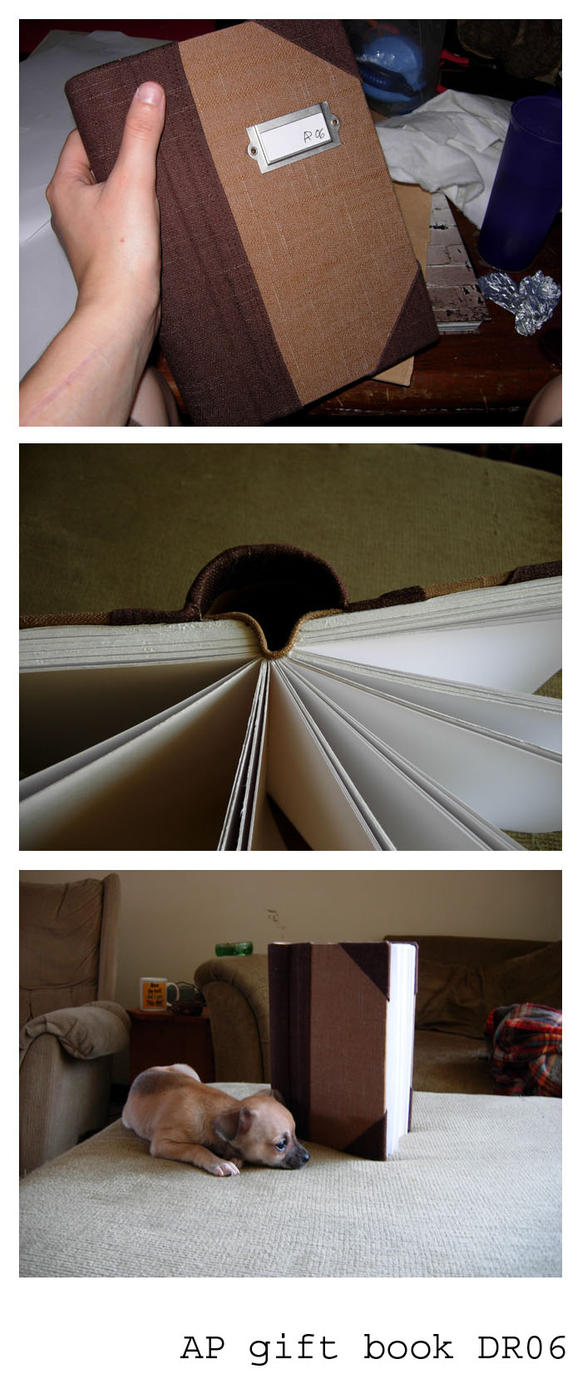
These are all the photos I have of the work in progress. Now, the next photos show the characteristics of the journal and the box:
Here is the box as it looks shut. Below, a close up of the handmade headbands I made for the box, to make it look as it was a book:
The box open, showing the journal it keeps. If it looks weird it's because the spine is rounded.
Below, the spine of the journal and its nerves:
And a close-up of the blind tooling I made in the center of the cover.
And the journal opens. You can see the marbled paper that I made some time ago on the endpapers:
A close-up on the handmade headbands of the journal:
And, finally, a close-up on the marbled paper:
Wow, so many pictures! But I hope you get a good idea on how the journal looks like. I wanted it to be a simple yet detailed in the making process work, and I am pretty happy with the results. Plus, I love those endpaper hehe.
I hope you enjoyed and have a great day!!
lunes, 2 de junio de 2014
A reference guide on bookbinding types
DISCLAIMER: I did not make this. It was made by Marenne, but I loved it so much I thought it needed to be shared. If you want to say something to her, you can contact her on her deviantart account. If you don't have one, let me know and I'll tell her.
That's her website: www.boekbindboetiek.nl
That's her deviant: http://marenne.deviantart.com/
And that's the original post: http://marenne.deviantart.com/journal/A-reference-guide-on-bookbinding-types-454645325
************************************************************************


That's her website: www.boekbindboetiek.nl
That's her deviant: http://marenne.deviantart.com/
And that's the original post: http://marenne.deviantart.com/journal/A-reference-guide-on-bookbinding-types-454645325
************************************************************************
When I tell people I’m a bookbinder they often think I make only one type of book; the library kind. That, however, is only one of the many ways an artist can create a book. For me, it’s a fun challenge to pick the right binding style to go with the purpose of the book. Whether it is a novel that needs to look really classy or medieval, a sketchbook for a graphic novelist or a paper about connections that lets me show the binding. In this article I’m going to tell you a little bit about all the types of bookbinding that I know. I’m not going into details but, if possible, I will link to images and tutorials that do.
If you’re here for inspiration: this guide is pretty long. I recommend scrolling through the images first!
To make a start…
The different ways of binding books can be broken down into two general groups: adhesive bindings and non-adhesive bindings. Adhesive bound books are the books you usually buy in bookstores: pockets, hardcovers, etc. Non-adhesive bound books almost always show the way they are bound; they have open spines or show the binding thread on the outside of the book. This last group is called non-adhesive bindings because they can be achieved without using any paste or glue. This is, however, not a necessity.
Terms
Signature – A signature is a set of papers folded one time.
Book block – A book block is a set of sewn signatures or a stack of glued single sheets that make out the inside of the book.
Endpapers – Endpapers are sheets of papers, folded once, attached with a little bit of glue at the spine-side at the front or the back of the book block.
Headband – A headband is a band made out of thread looped around a rope or strip of leather. Headbands can be machinemade and glued at the head and tale of the spine of a book. They can also be handmade by sewing them onto the signatures.
Hinge – The hinge of a book is the place near the spine of the book where the cover folds open.
Rib – A rib is a thickening on the spine of a book. This thickening is created because there are ropes below the cover material. Sometimes fake ribs are created by placing strips of cardboard below the cover material.
Slot - A slot is a cut in the paper, creating a place for the glue to adhere to or the thread to go through.
Non-adhesive bindings
Non-adhesive bindings #1: Pamphlet stitch
The pamphlet stitch can be used to bind single signatures into pamphlet. A string is sewn through 3, 5, 7 or up (depending on the size of the paper) pierced holes in the fold of the signature. Both ends of the string always end up in the middle, creating the opportunity for easy finishing by means of a single knot.
While it could be argued if a single signature can be called a book, I’ve included it in this list because the pamphlet stitch itself can be used in combination with other binding techniques (such as the Concertina fold) to create multiple signature bindings.
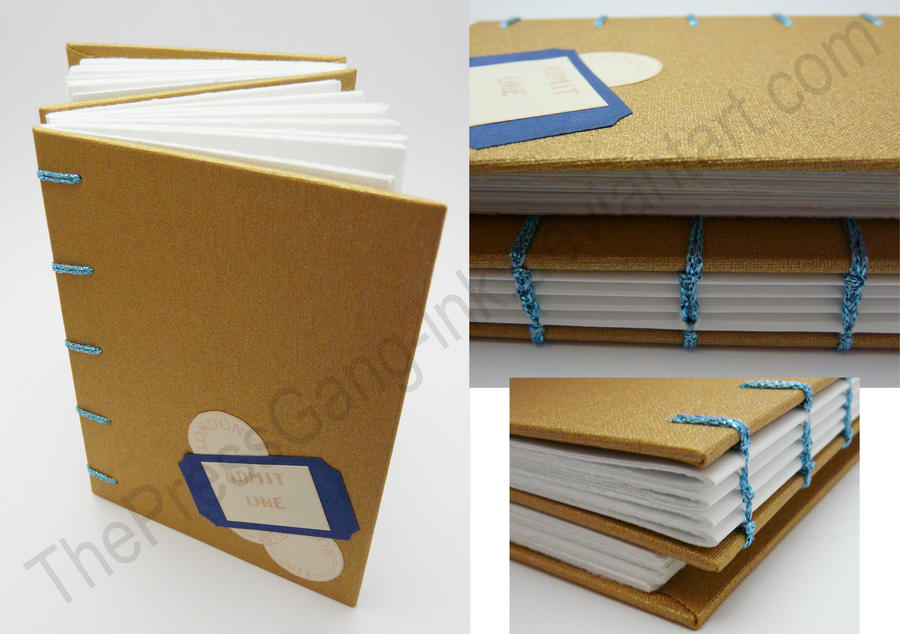
The pamphlet stitch is sometimes used to bind two signatures together. The cover will have a double Accordion fold in the middle with a signature sewn into each inner pleat.
The pamphlet stitch is sometimes used to bind two signatures together. The cover will have a double Accordion fold in the middle with a signature sewn into each inner pleat.
Tutorials:
- Pamphlet Stitch Tutorial by ThePressGang-ink, deviantART tutorial
- Pamphlet Stitch by unknown, PDF
- Double Signature Stitch Journal by Janet Banks, PDF
- 5-hole Pamphlet Stitch by ElvieStudio, video
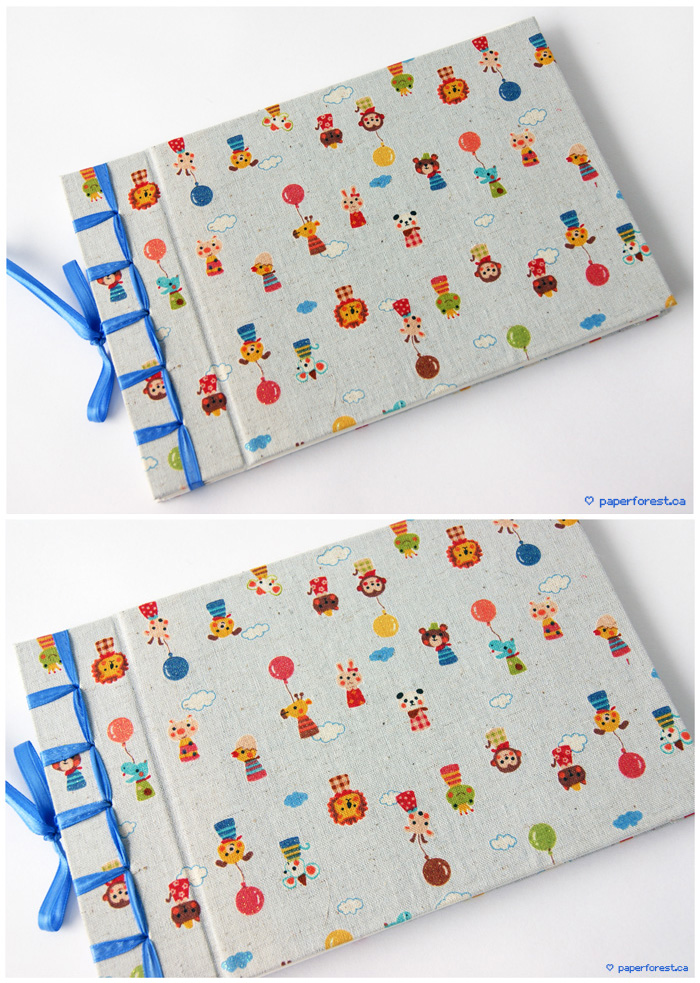
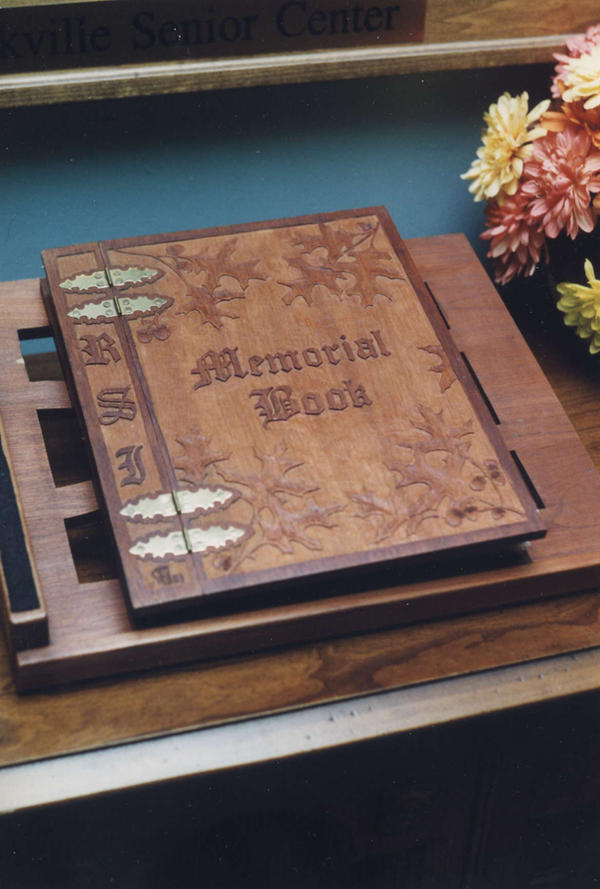
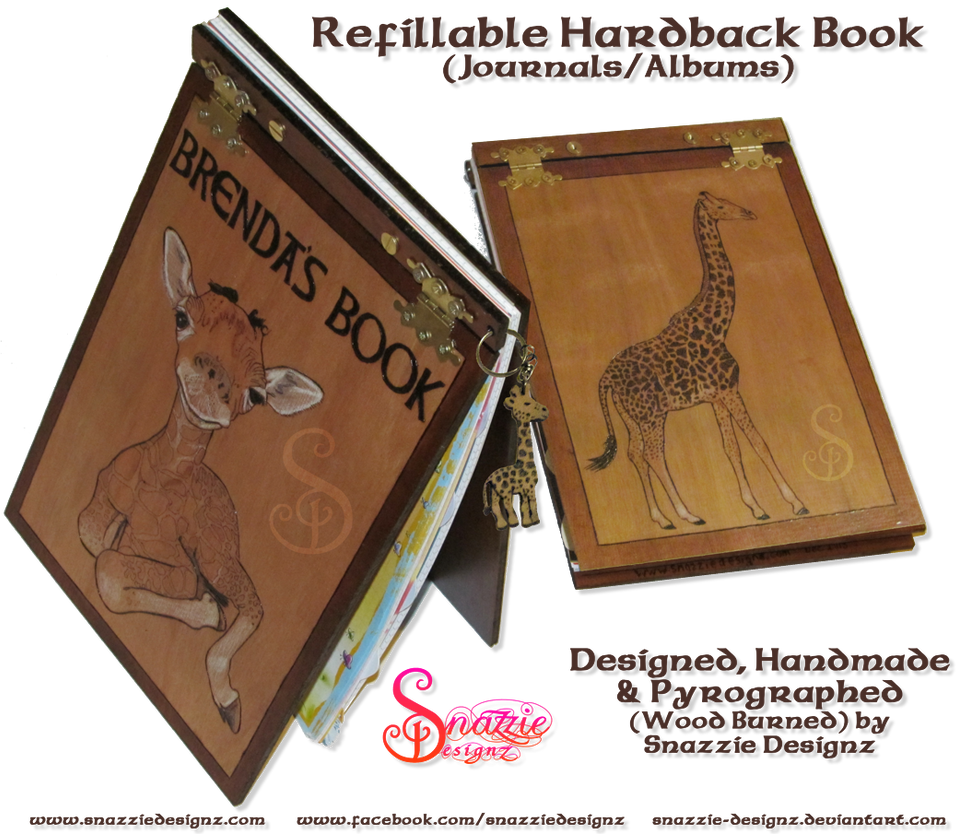
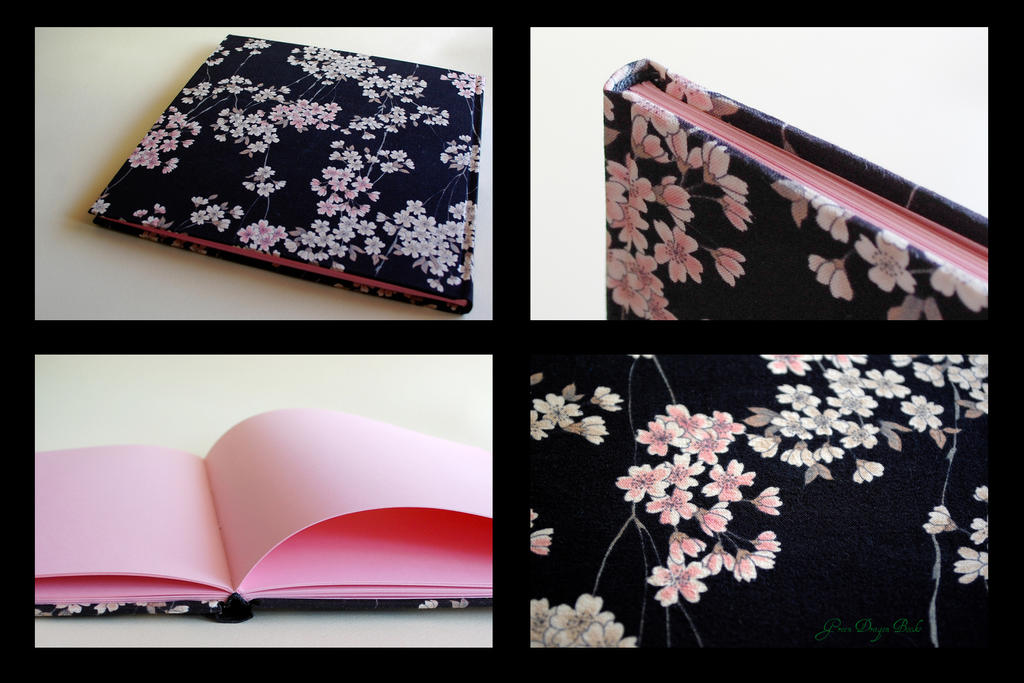
Non-adhesive bindings #2: Stab-bindings (or Japanese bindings, Album bindings)
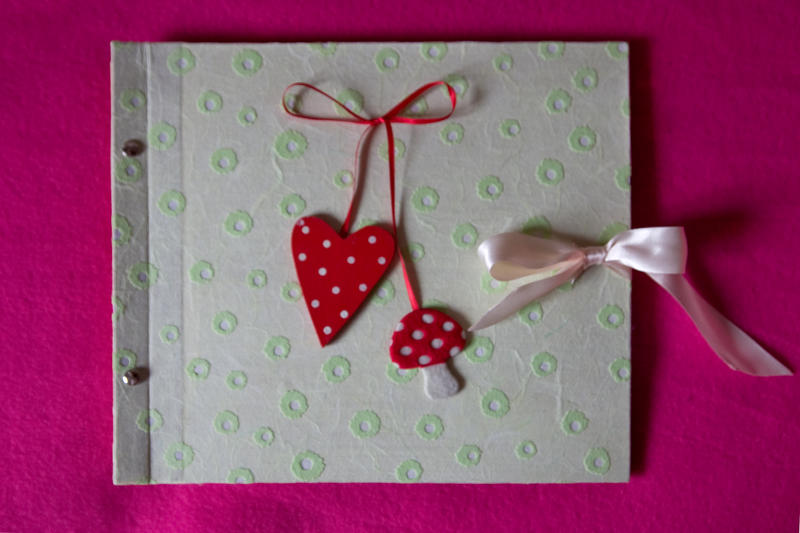
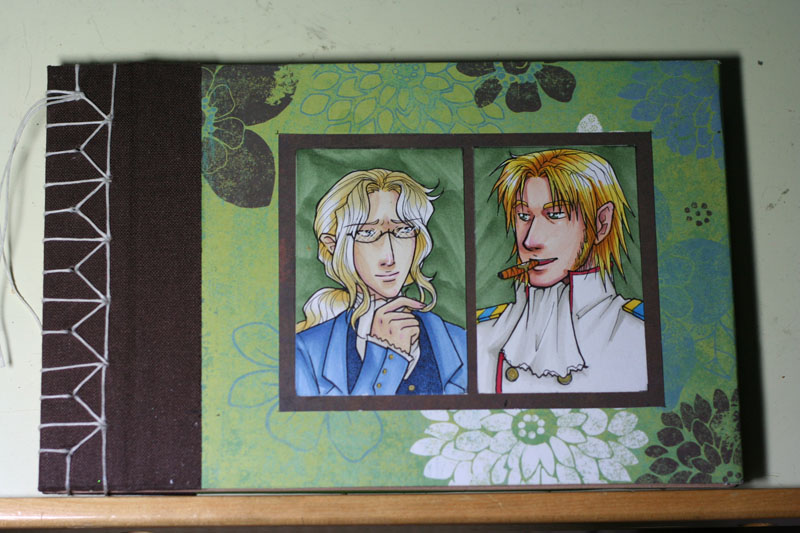
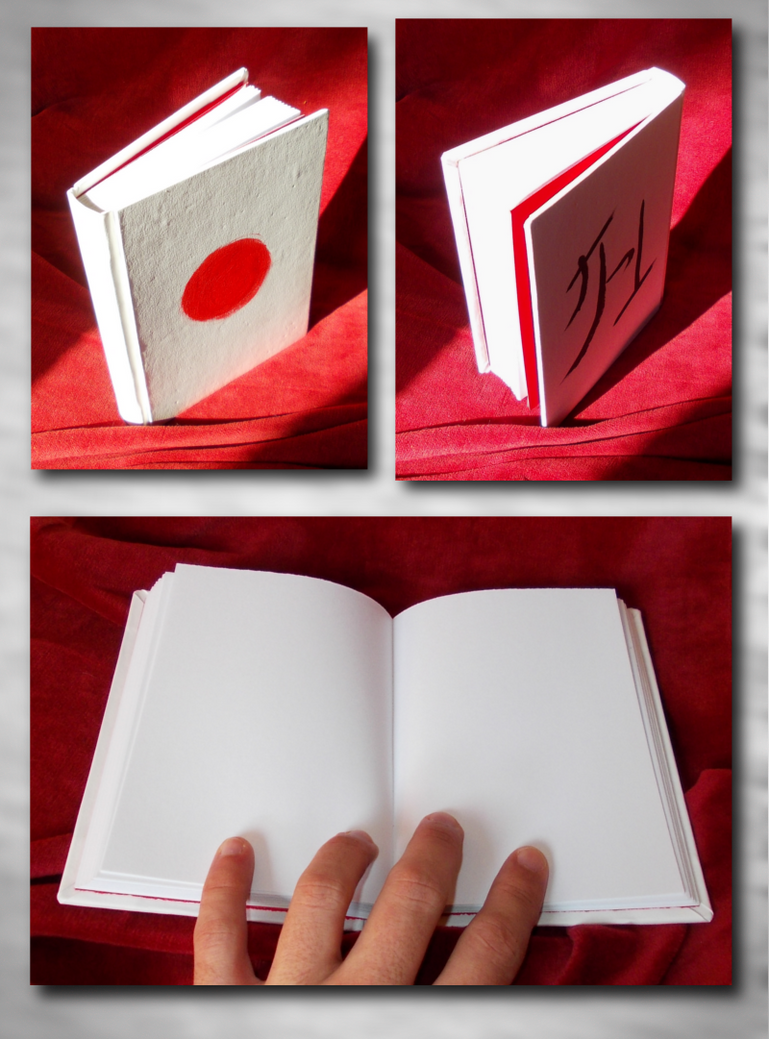
Stab bindings can be used to bind single (not folded) sheets into a book. Stab-bound books will not be able to lay flat when opened in the middle. In Japan, these bindings have been used for centuries. 4 major sewing patterns can be identified in Japanese stab-bindings: The Noble binding (Koki Toji), The Tortoise-shell binding (Kikko Toji), The Hemp-leaf binding (Asa-No-Ha Toji) and the 4-hole binding (Yotsume Toji). Covers of stab bindings may be sewn together with the rest of the papers, or folded over or around the book block, making the binding invisible before opening the front cover.
Instead of sewing the pages, they can also be held together using book screws, the so called nuts and posts, creating an album stab-binding. An added bonus of this variety is the ability to add or remove pages, or to change the order of the pages, making it perfect for photo albums, recipe books, collecting books, etc.
Tutorials:
- Japanese Stab Stitch Binding by Tsubasa-No-Kami, deviantART tutorial
- The Four Hole Bookbind by pdtnc, deviantART tutorial
- Japanese Stab Binding by lexarch, deviantART tutorial
- Japanese Bookbinding Tutorial by Tuteate, video
- Screw Post Binding by pupuccachu, webpage
- Postbound DIY bookmaking by Brooke Adams, video
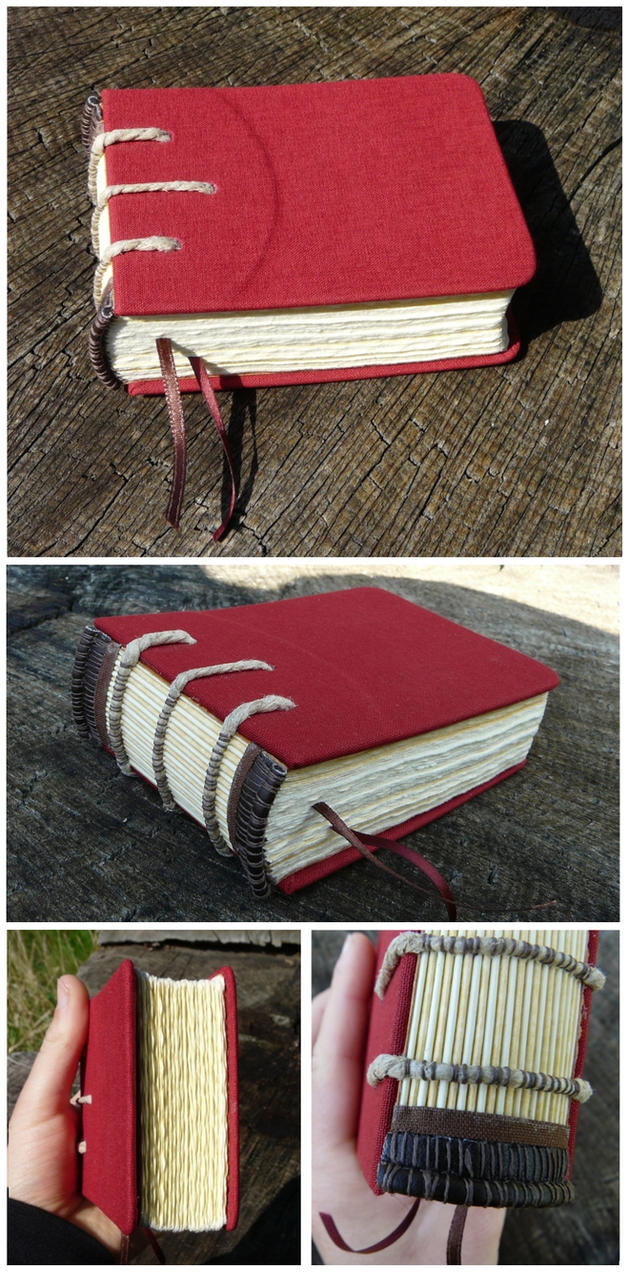
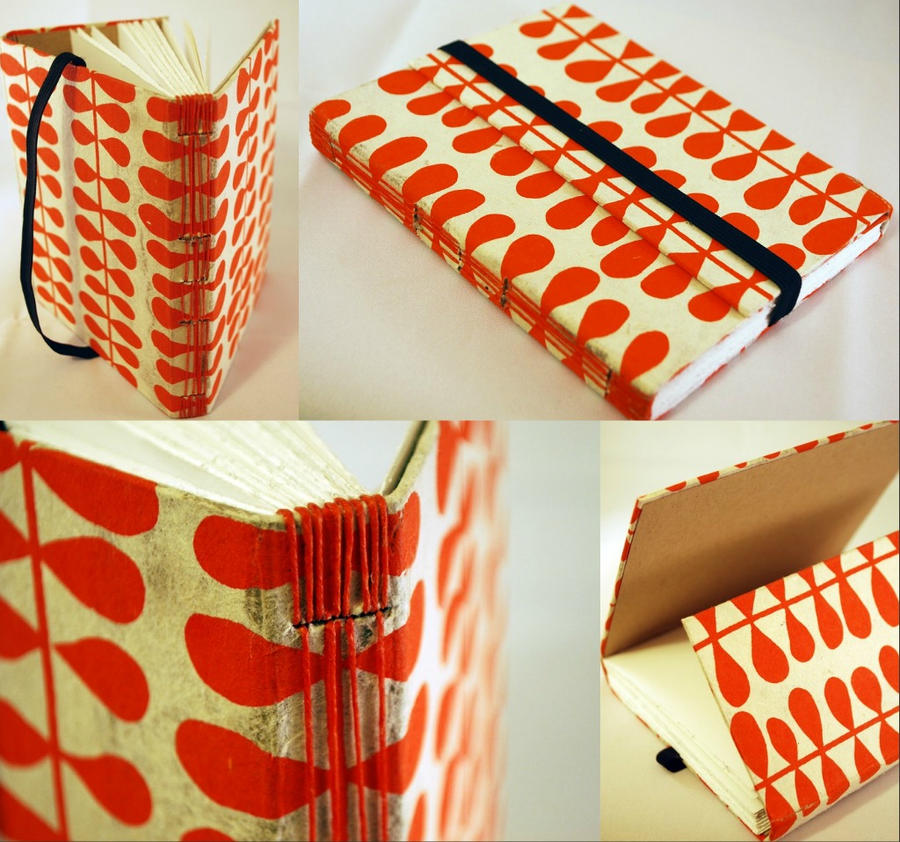
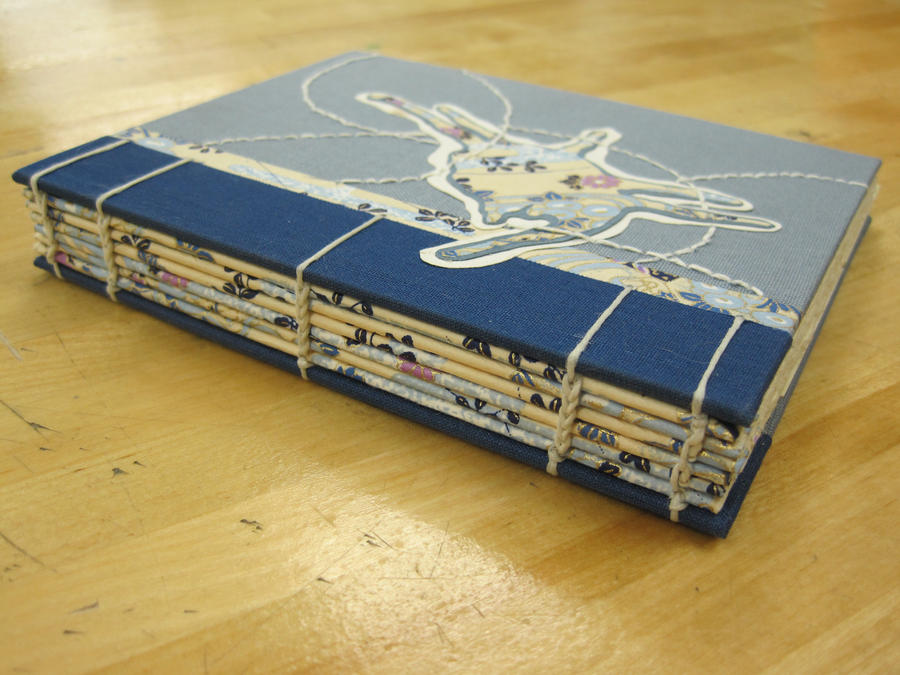
Non-adhesive bindings #3: Long stitch (or Medieval limp binding)
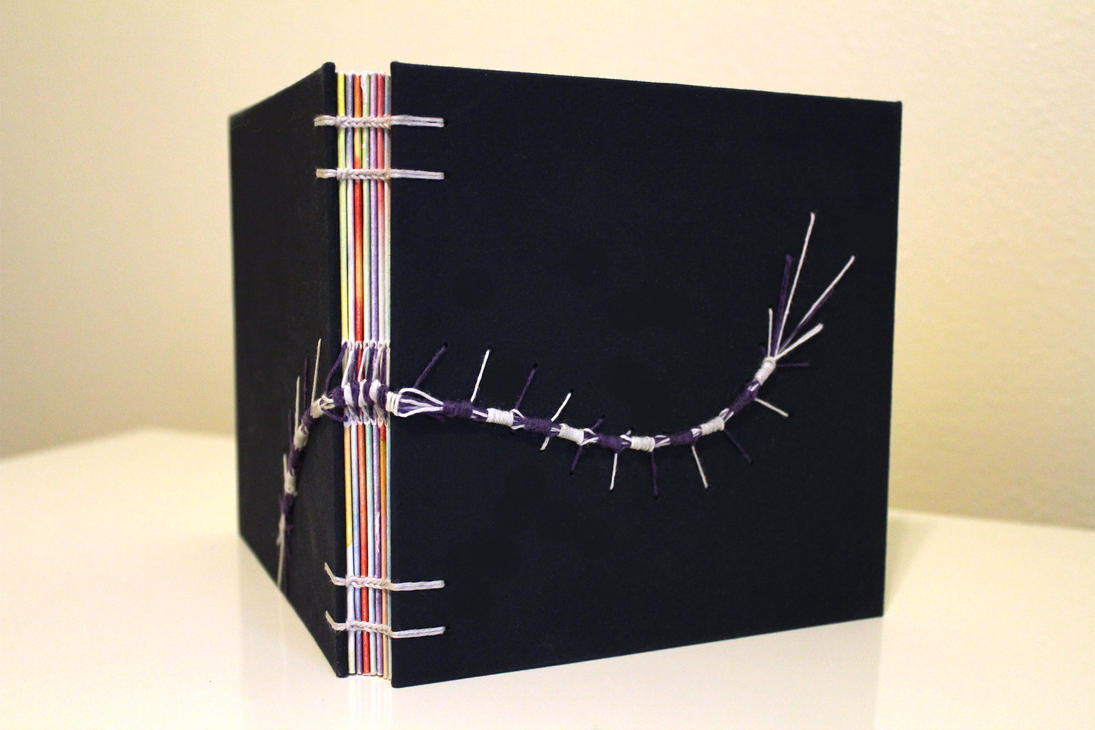
The long stitch binding method is a quick sewing method that binds the signatures and cover together with the same single thread. The cover can be slotted or pierced before sewing, or pierced during the sewing procedure. Because the thread will go in and out of the cover, and in and out of the signatures; two variations of sewing can be used. One variations will see all the outside thread on the same line while the other alternates between slots. Sometimes thread patterns are created by crossing over to different signatures during the sewing process.
Stitch variations on the long stitch binding method include:
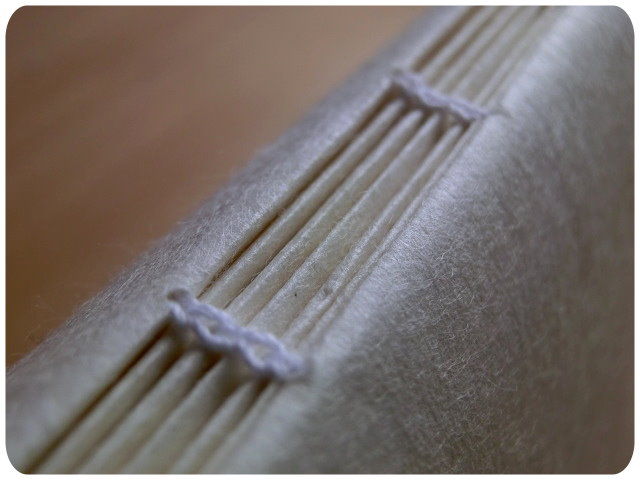
- The buttonhole stitch, where alternate slots will be removed to create exposed parts of the signatures, and the signatures will be locked together using the buttonhole stitch at the head and tail of each slot.
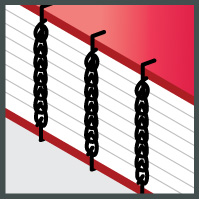
- The link stitch, where the binding will not be looped through the ends of the signatures but instead a link stitch will be used at the outside of the cover, creating a sort of chain-binding at the head and tail of the spine.
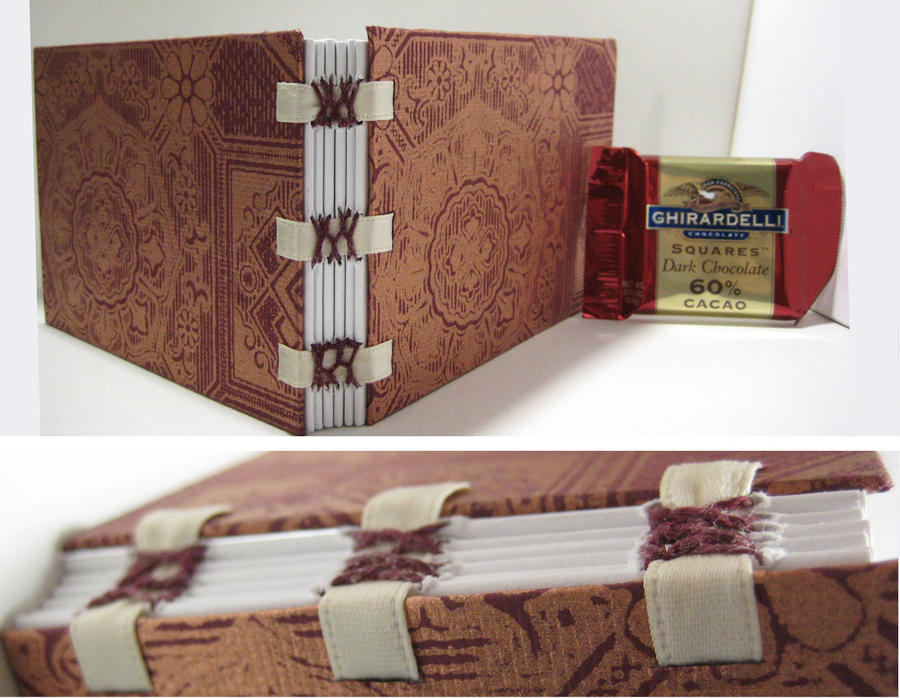
- Sewing onto tapes, where we sew around tapes instead of cover-slots. These tapes will then be attached to the two separate covers.
- Sewing onto cords or ropes, where we sew around a cord and then go back into the same pierced hole. The cords will be attached to two separate covers. Sometimes two cords are placed tightly against each other.
Tutorials:
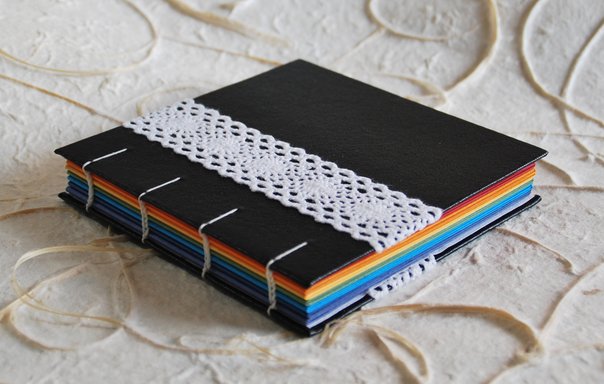
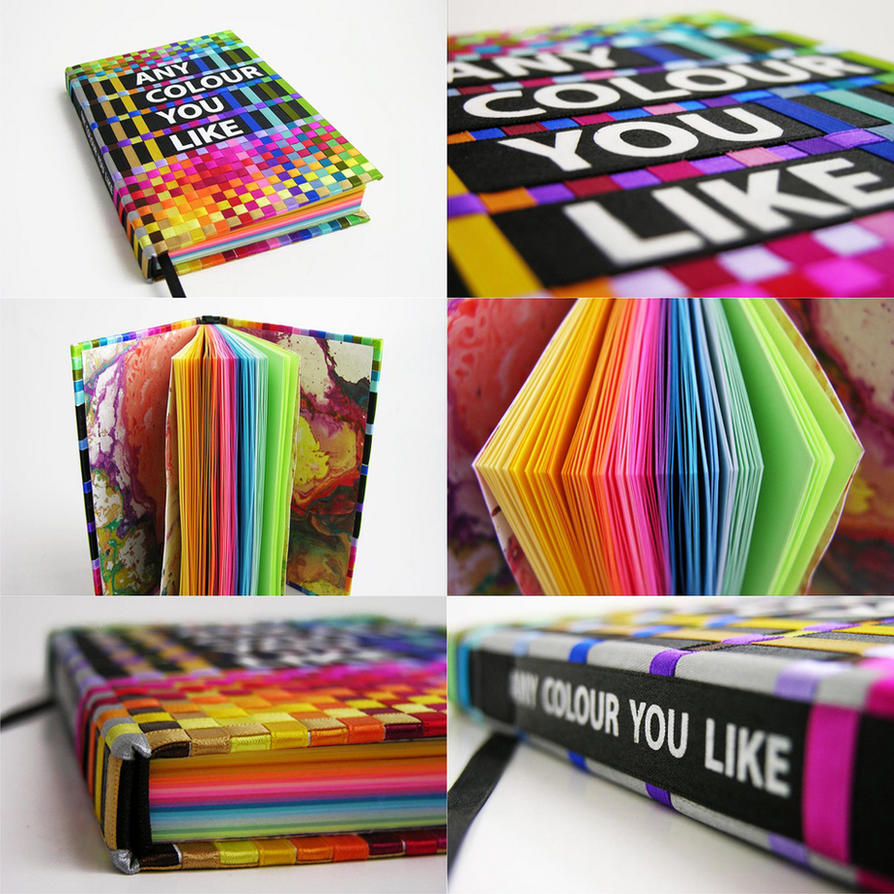
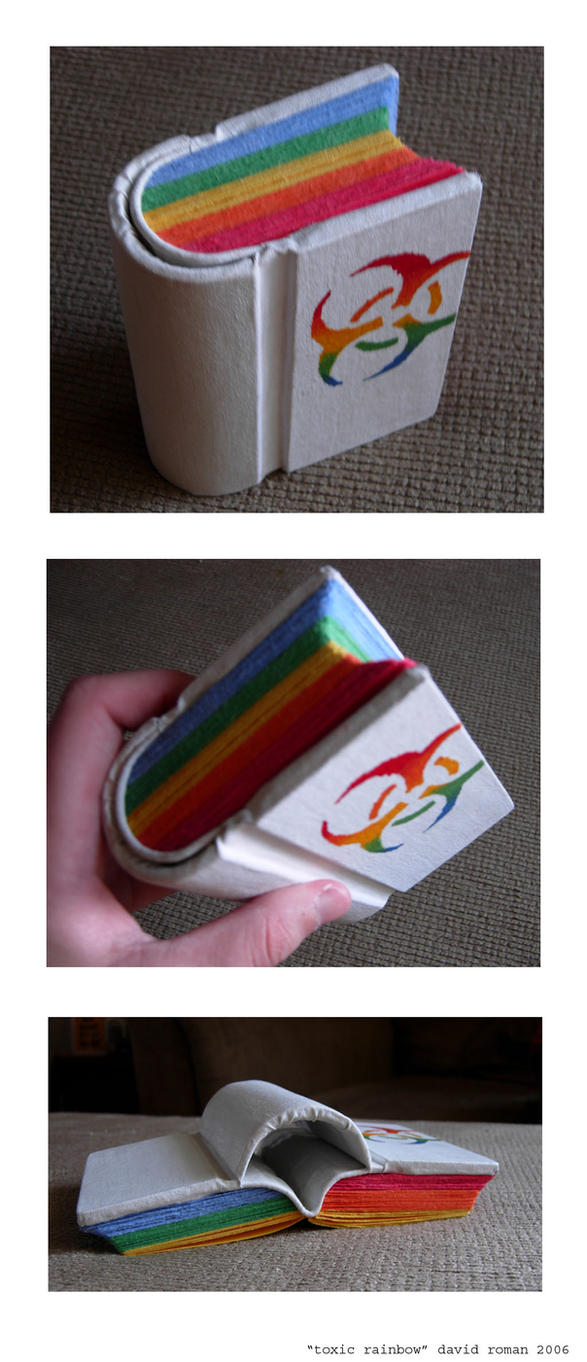
- Rainbow Book Tutorial by Marenne, deviantART tutorial
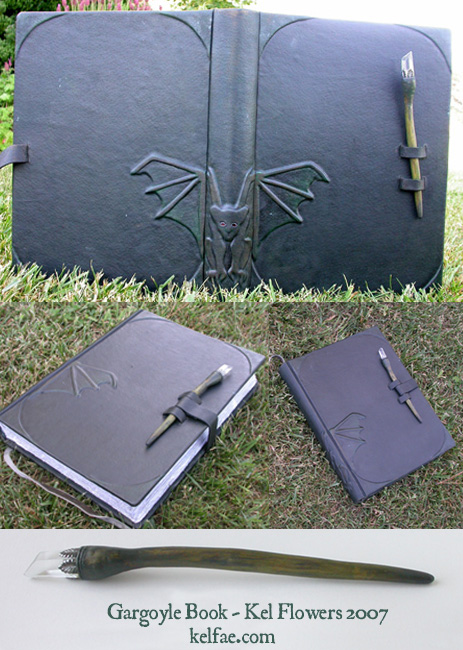
- Long Stitch Leather Journal by Erica Munoz, webpage
- Long Stitch Binding Tutorial by Sea Lemon, video
- French Link Binding Tutorial by Pastiche Knitwear, webpage
- The Exposed Tape Binding by Molly Brooks, webpage
- Exposed Tape Tutorial by lunkirsten, video
- Sewing on Cords by BookbindersChronicle, video
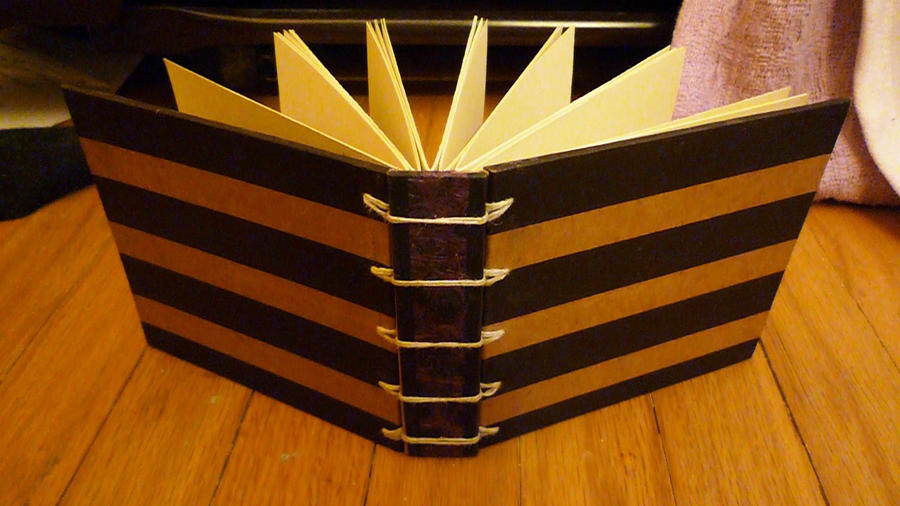
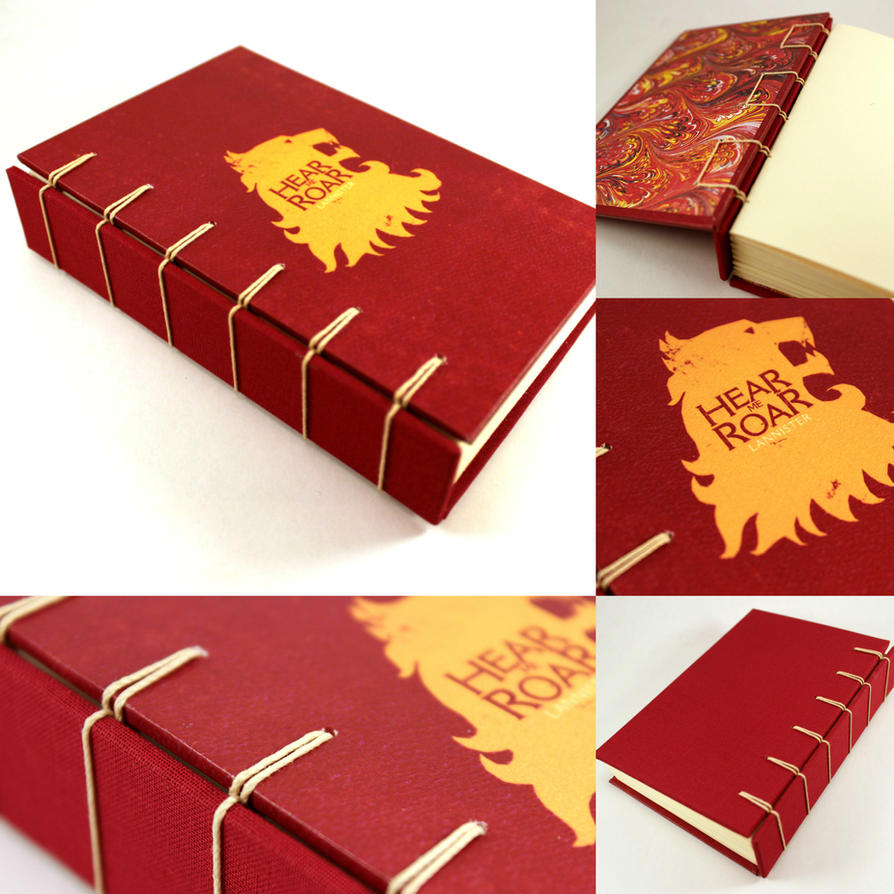
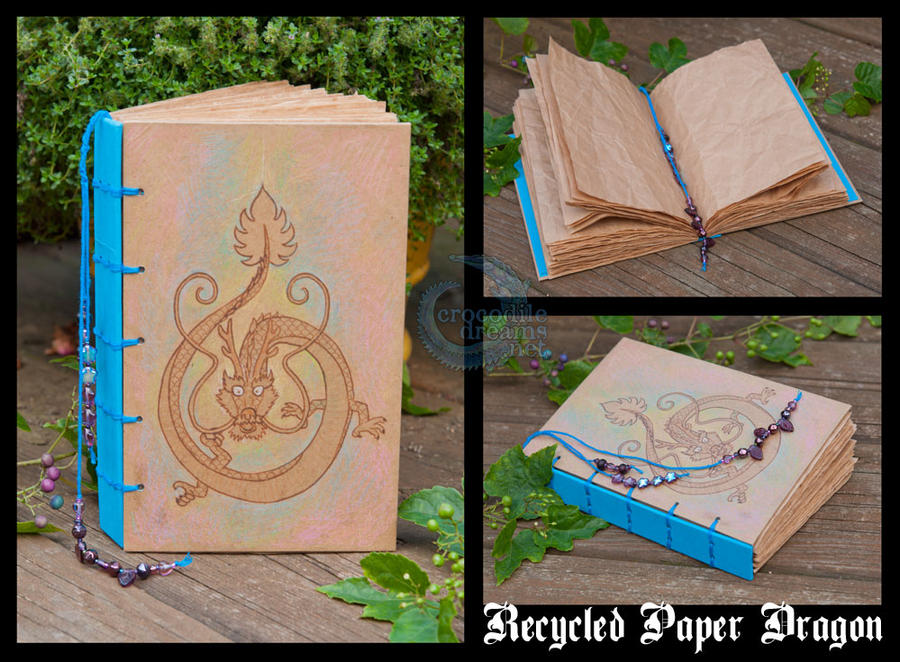
Non-adhesive bindings #4: Coptic bindings (including the Caterpillar binding)
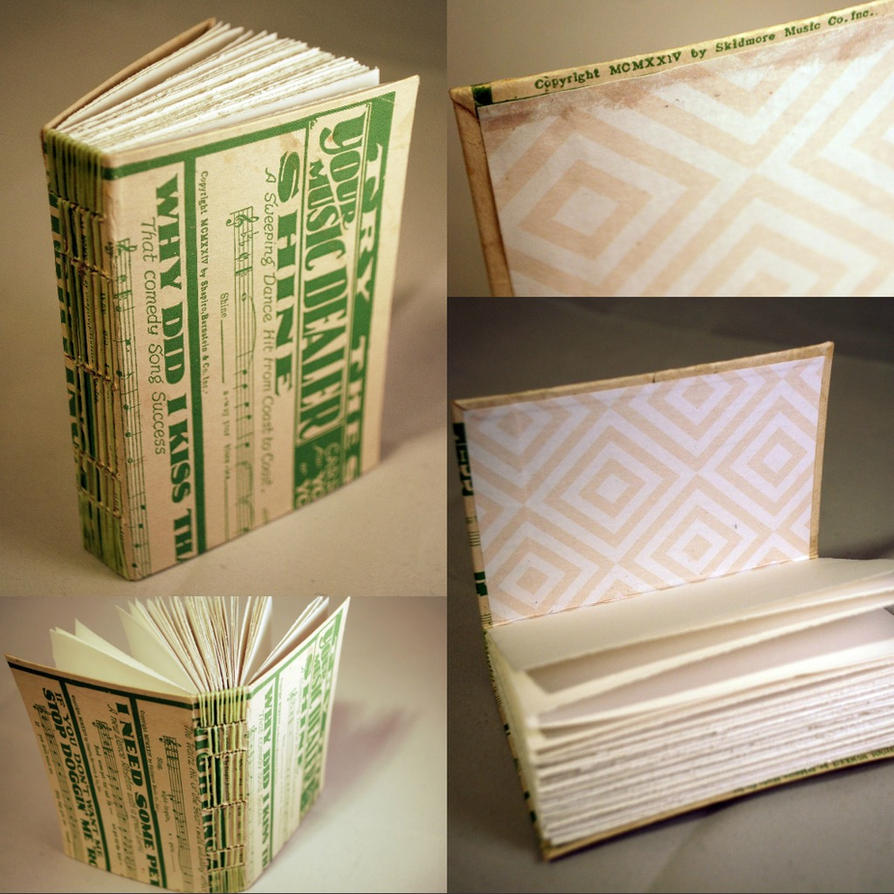
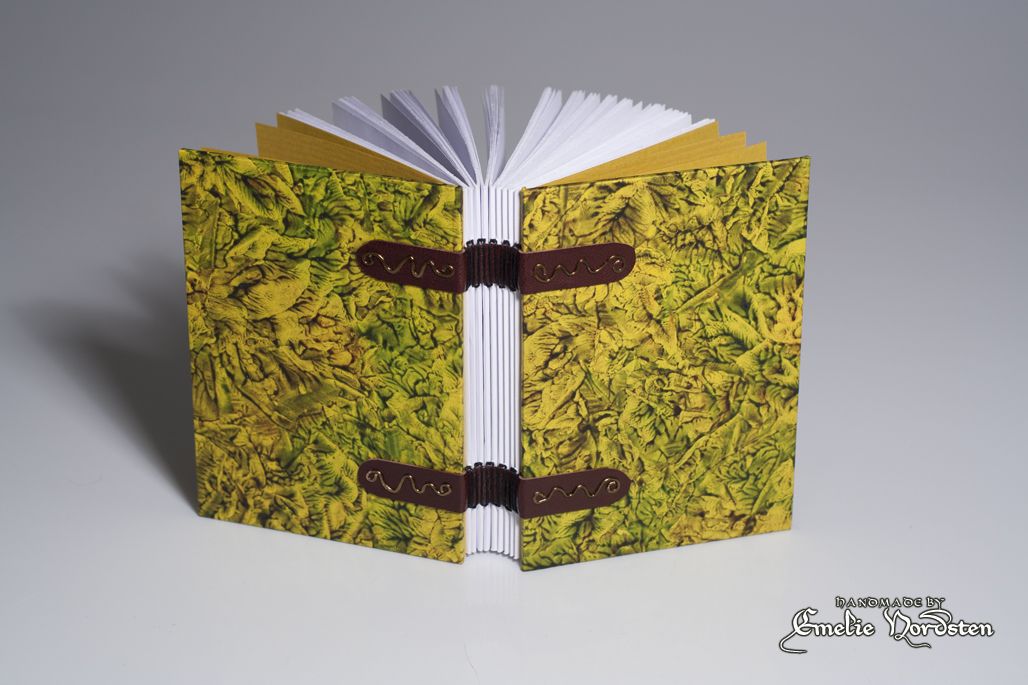
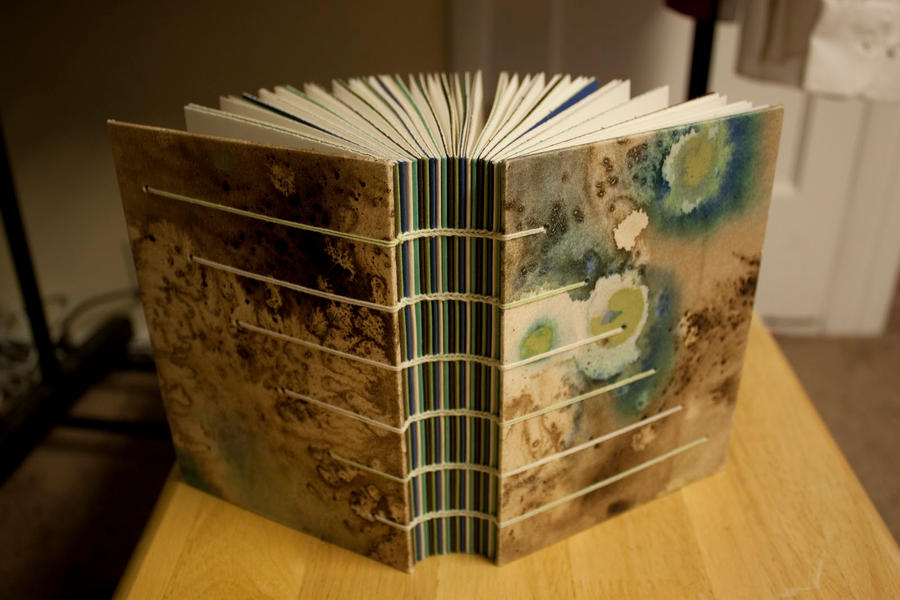
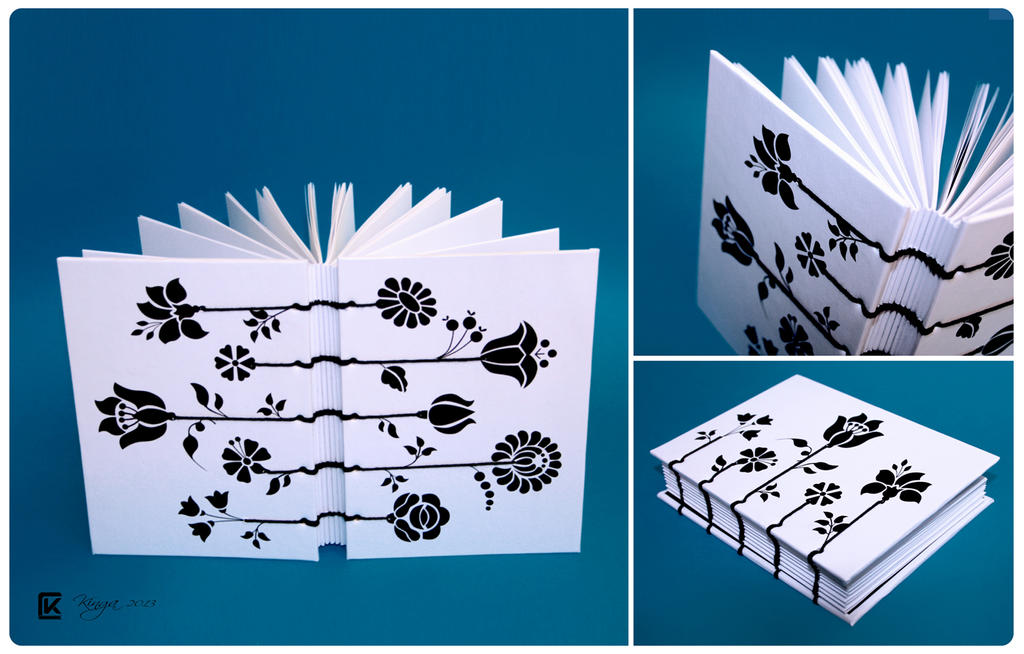
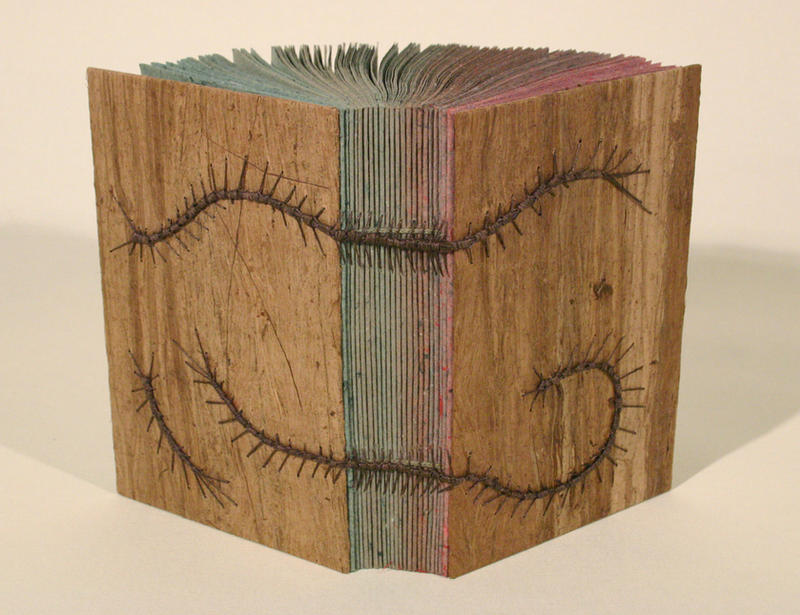
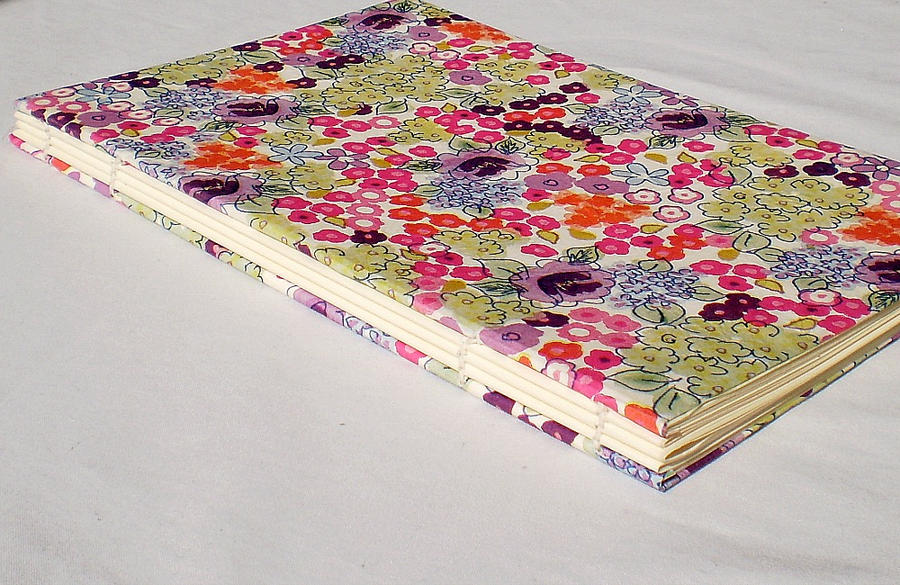
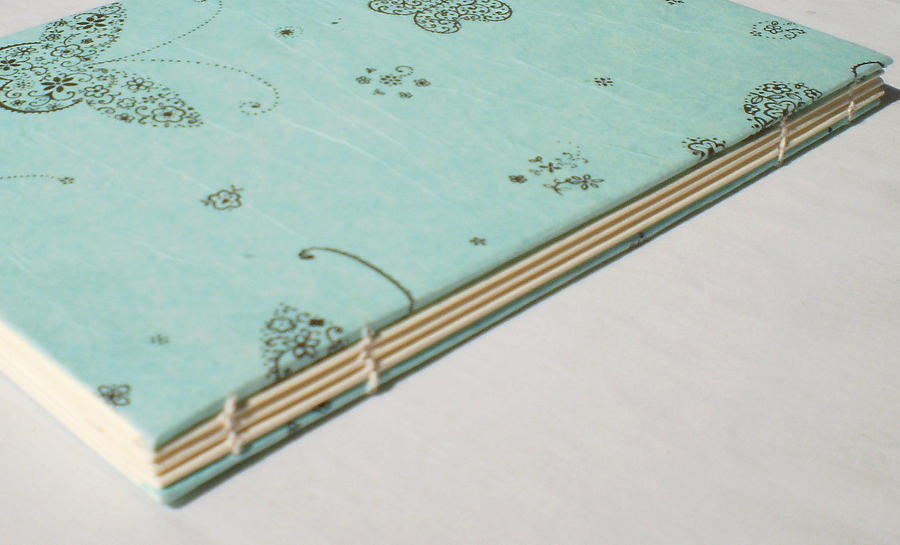
The Coptic binding is an appealing exposed spine sewing method. The thread will come out of a pierced hole, loop around a piece of thread from the previous signature, and go back into the same hole. Getting a tight and even binding will take a little practice, but is certainly worth the effort. The binding does not have to be straight, it can be sewn criss-cross or smooth or in patterns. Covers can be made out of folded sheets that may be glued together or from stiff cardboard. It’s important to make the covers the exact same height of the pages. The binding is not strong enough to keep the signatures from sagging, if they can not rest on the shelf during storage.
The Caterpillar binding is a variation on the coptic binding using paired holes. Threads coming out of both holes come together in the middle, creating the illusion of a caterpillar with a million legs, crawling over the spine and the covers.
Tutorials:
- A handy notebook tutorial by ThePrinceOfParties, deviantART tutorial
- Coptic Bookbinding by mouse2cat, deviantART tutorial
- Coptic Stitch Sketchbook by Sea Lemon, video
- Caterpillar Stitch by Keith Smith, PDF
- Caterpillar Stitch by Mike Commons, video
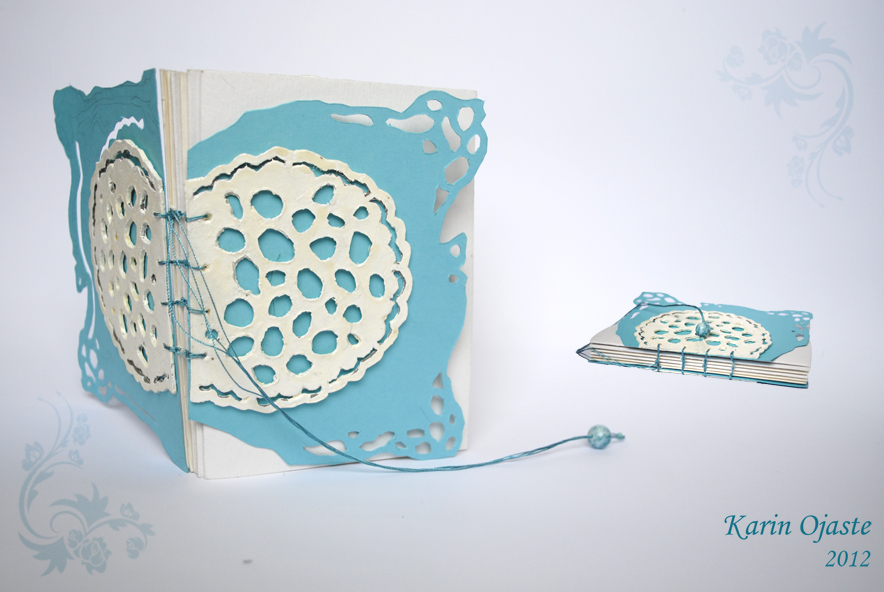
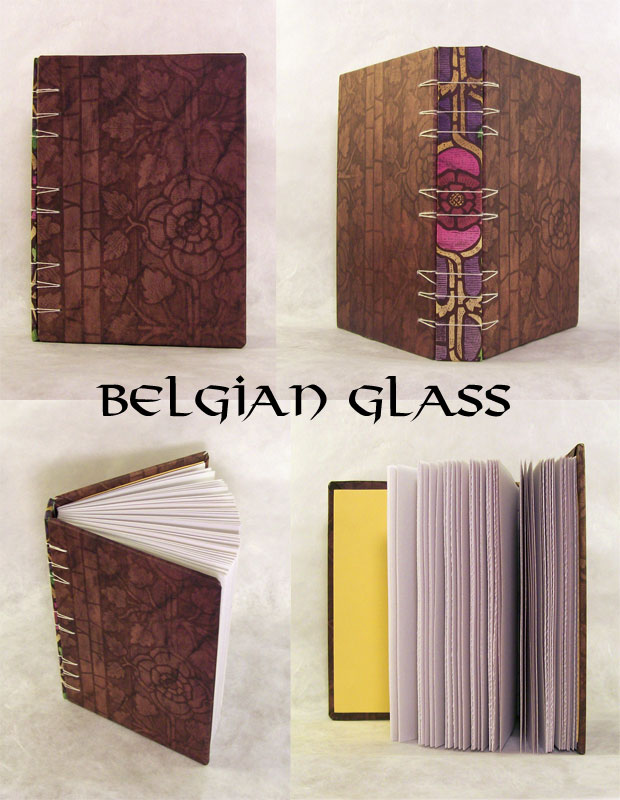
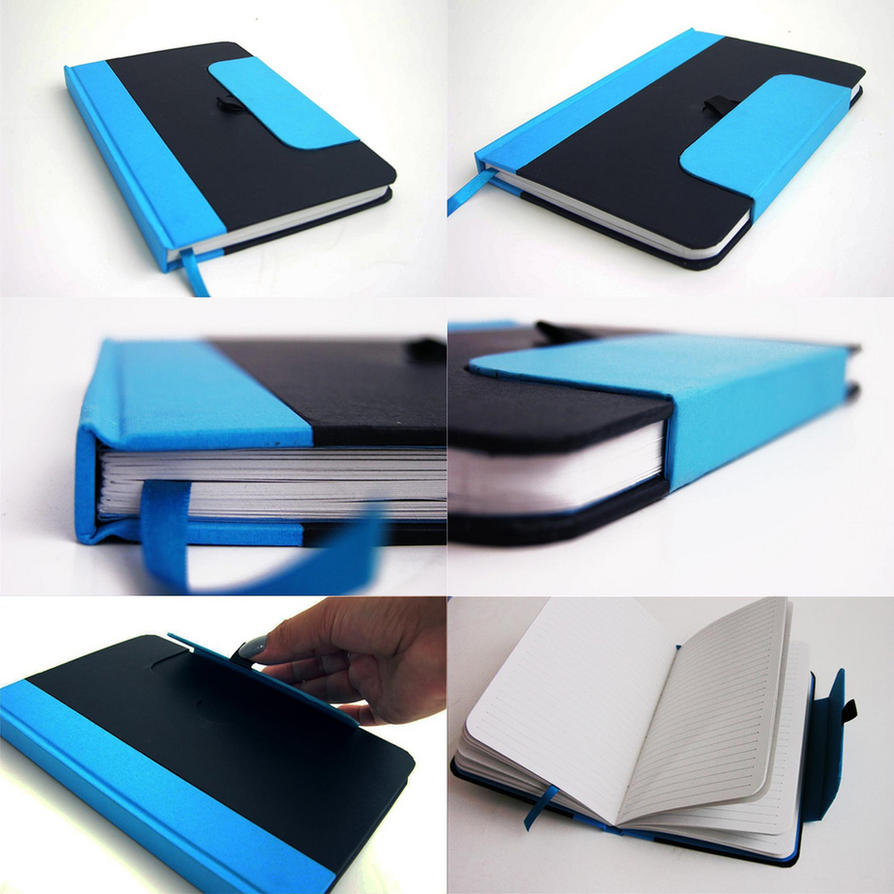
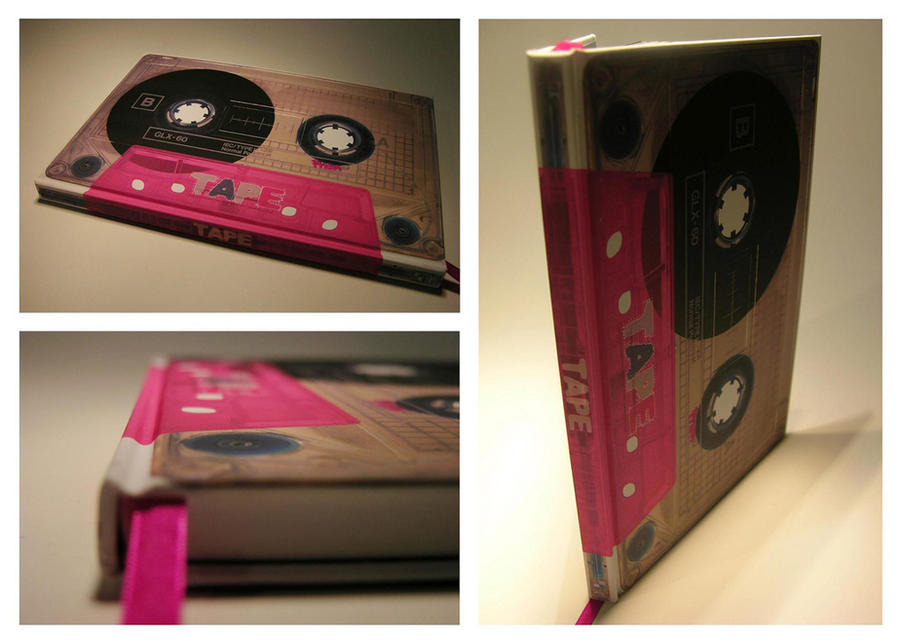
Non-adhesive bindings #5: Secret Belgian bindings
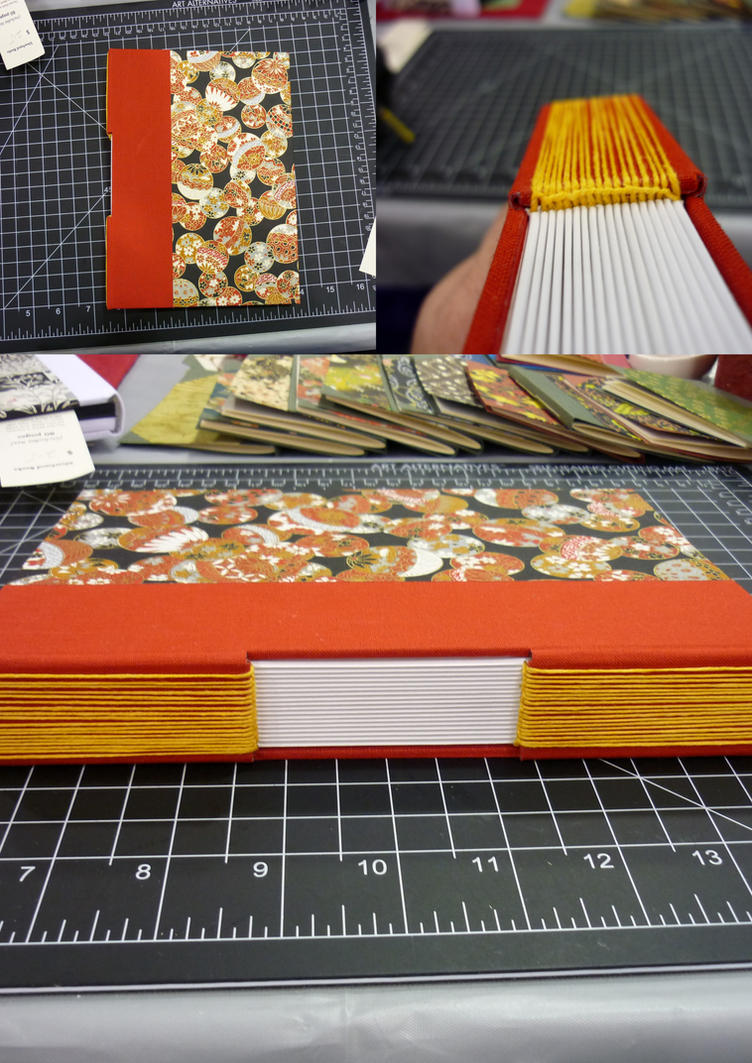
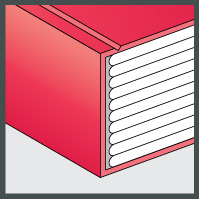
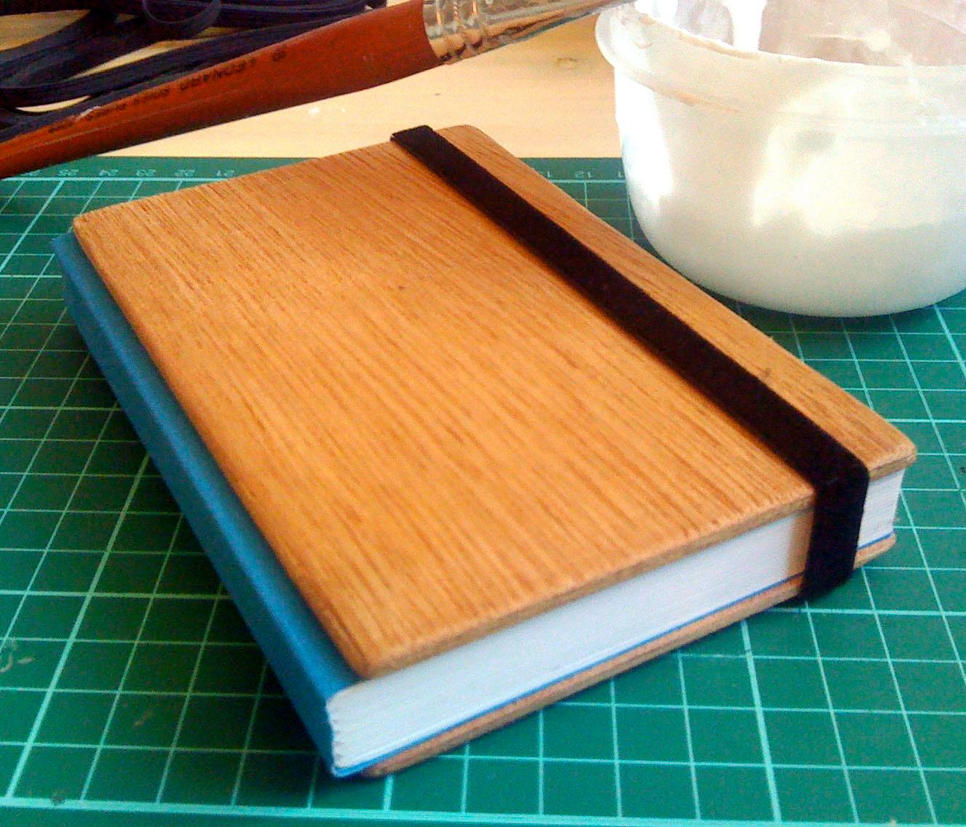
The way the secret Belgian bound books are made was only recently rediscovered. This binding method is wonderful because it creates the illusion of a full hardcover book, while you can create the front, back, and spine boards separately. This creates the opportunity to use unbendable materials like plastics and wood for the entire book. The special sewing method binds all three cover-parts and the signatures together in one go.
Tutorials:
- Secret Belgian Binding by gatzbcn, webpage
- Top Secret Belgian Binding Tutorial by Erin Fletcher, webpage
- Secret Belgian Binding Art Journal by Monique vmb, video
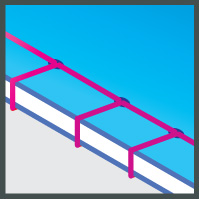
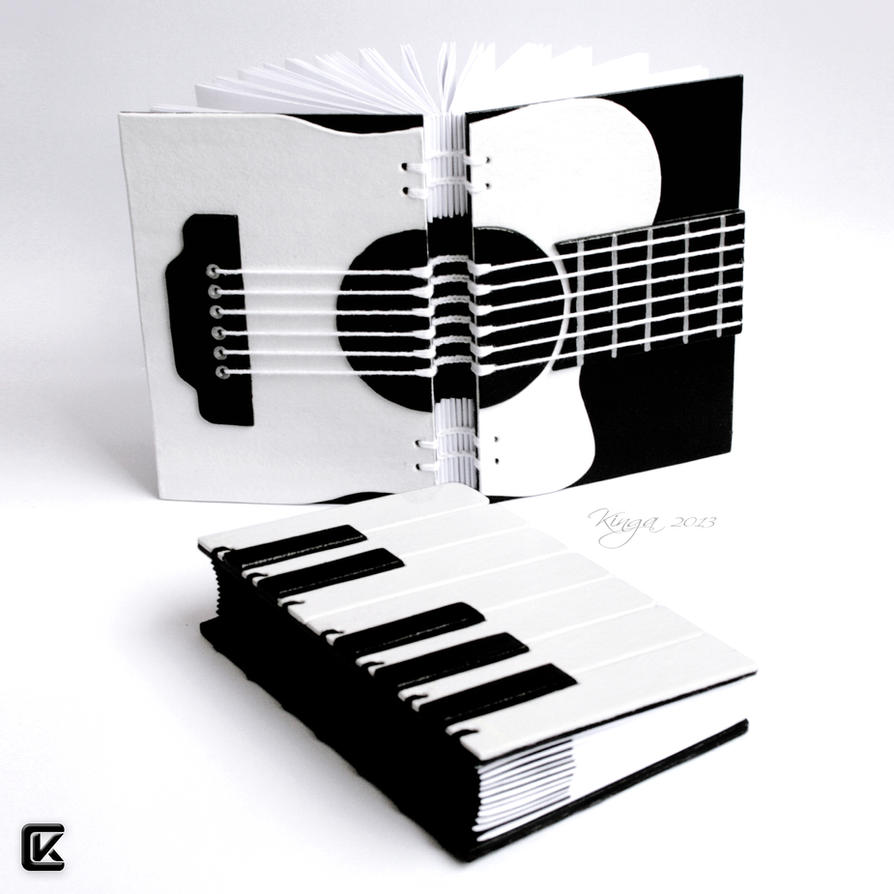
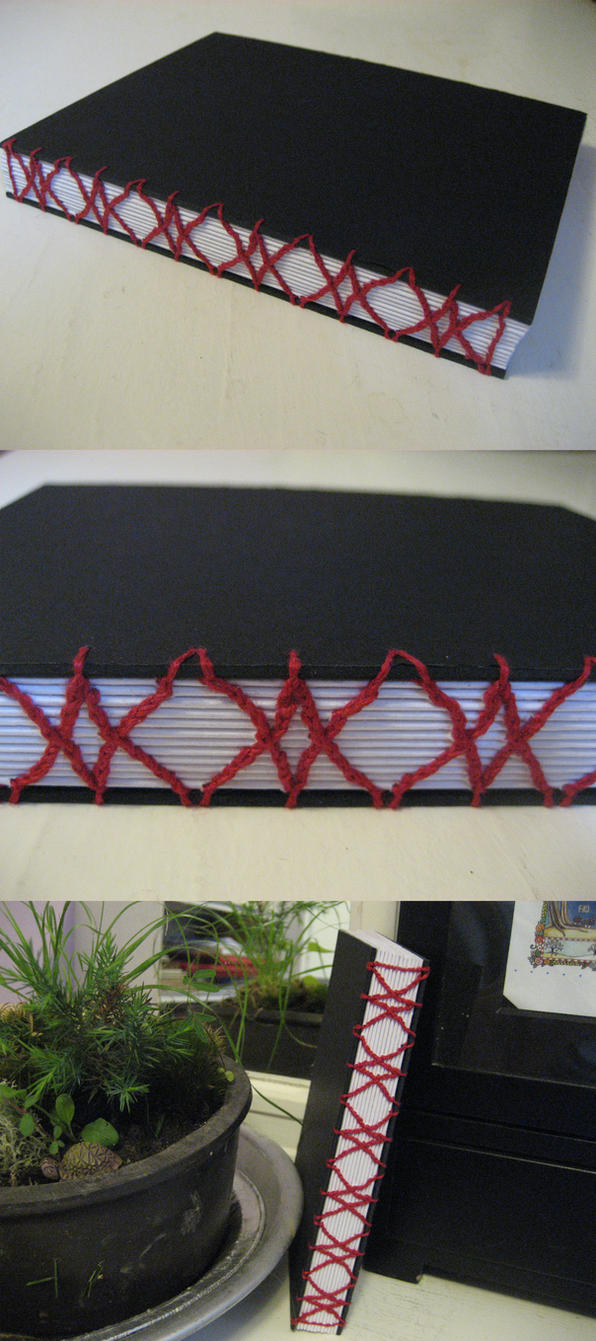
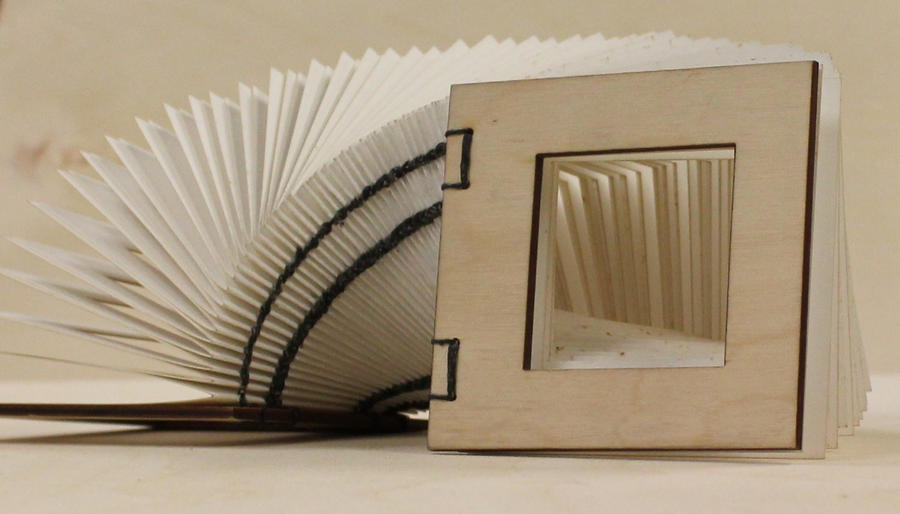
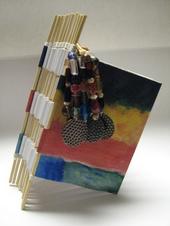
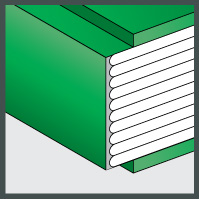
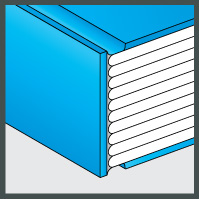
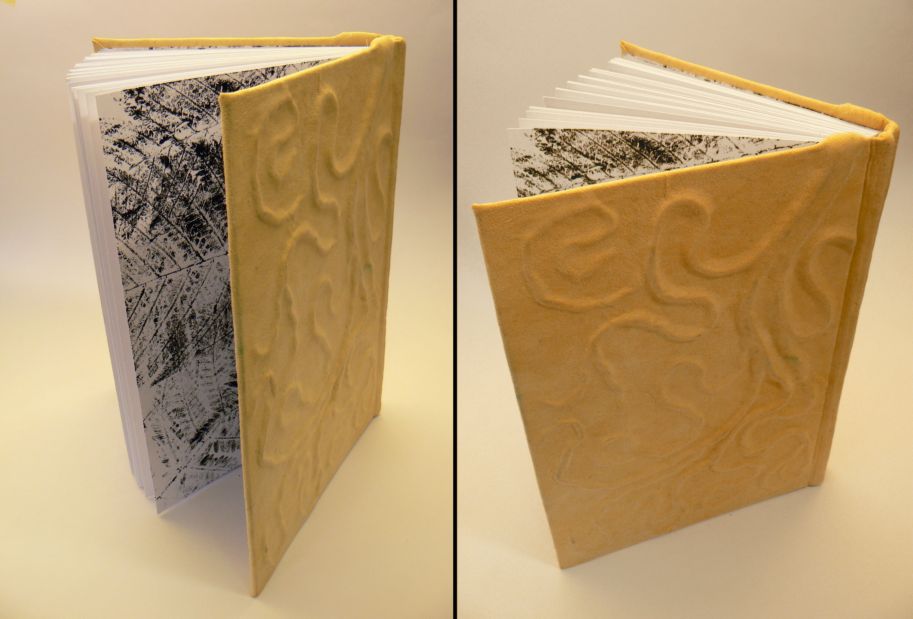
Non-adhesive bindings #6: Piano hinge binding (or Skewer binding)
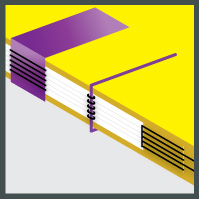
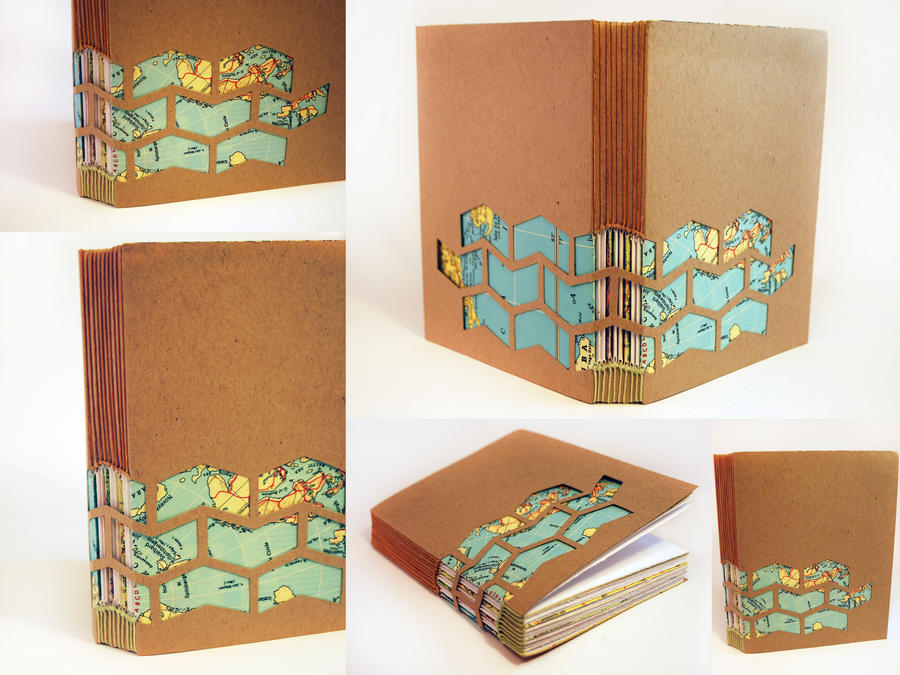
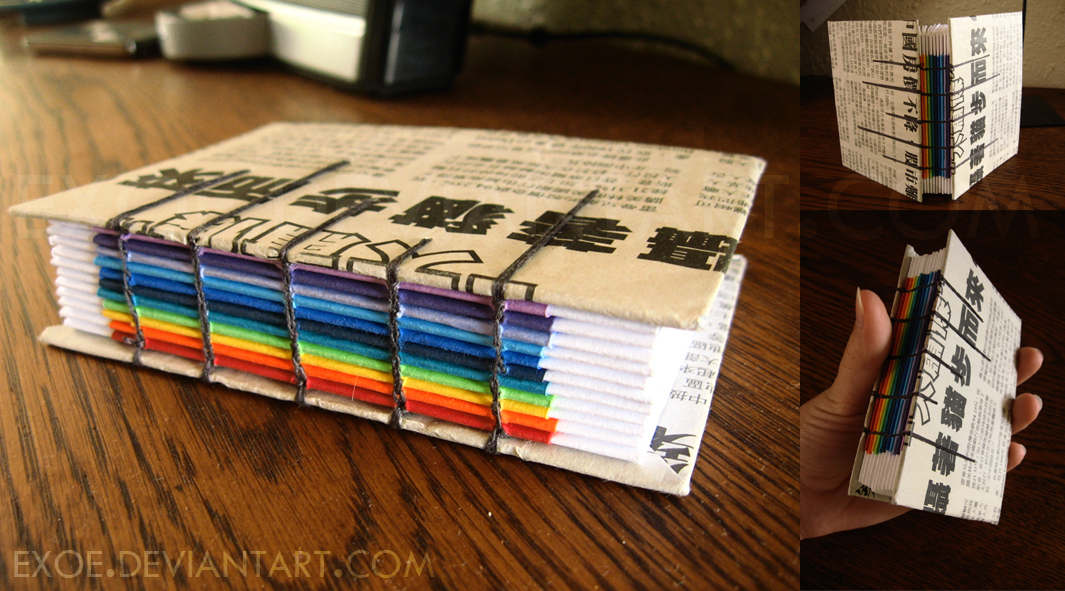
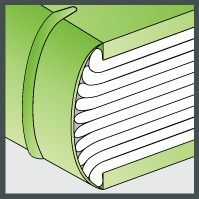
The Piano hinge binding is a very sculptural binding method. It uses pins to bind papers together by inserting them into alternating slots at the bend of the (very thin) signatures. When this kind of book is opened, a dovetail hinge can be seen.
Tutorials:
- Piano Hinge Book Tutorial by madcrafter, webpage
- How to make a Piano Hinge Book by Bumble, webpage
- Piano Hinge Book by Tricia Morris, video
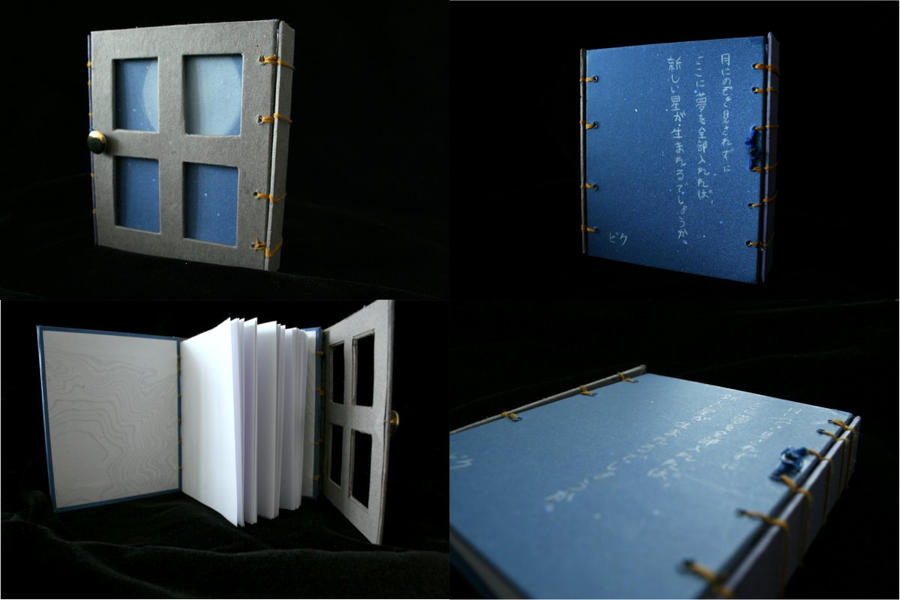
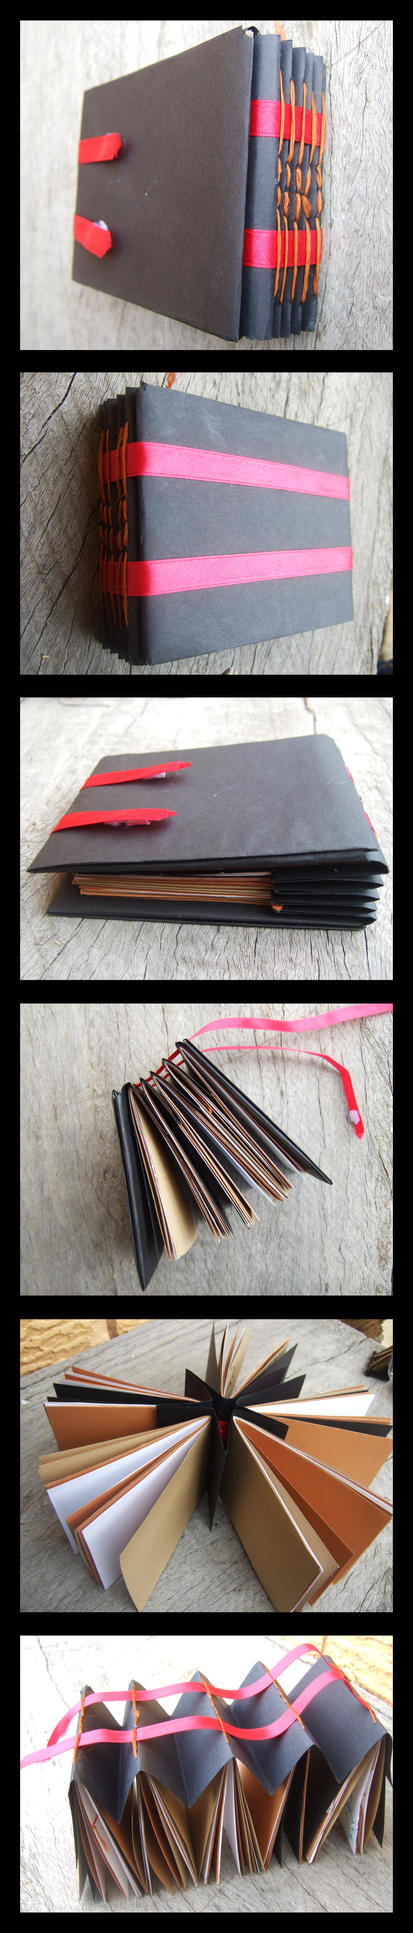
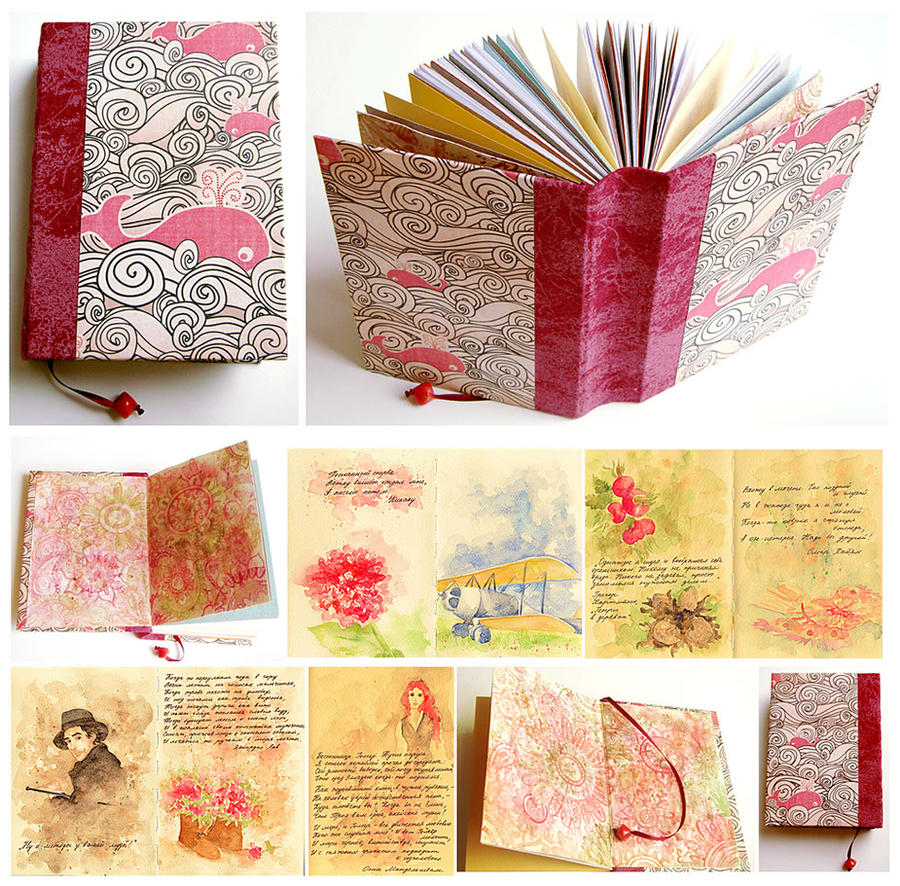
Non-adhesive bindings #7: Compound bindings (including the Concertina binding, the Dos-à-dos format and the French doors format.)
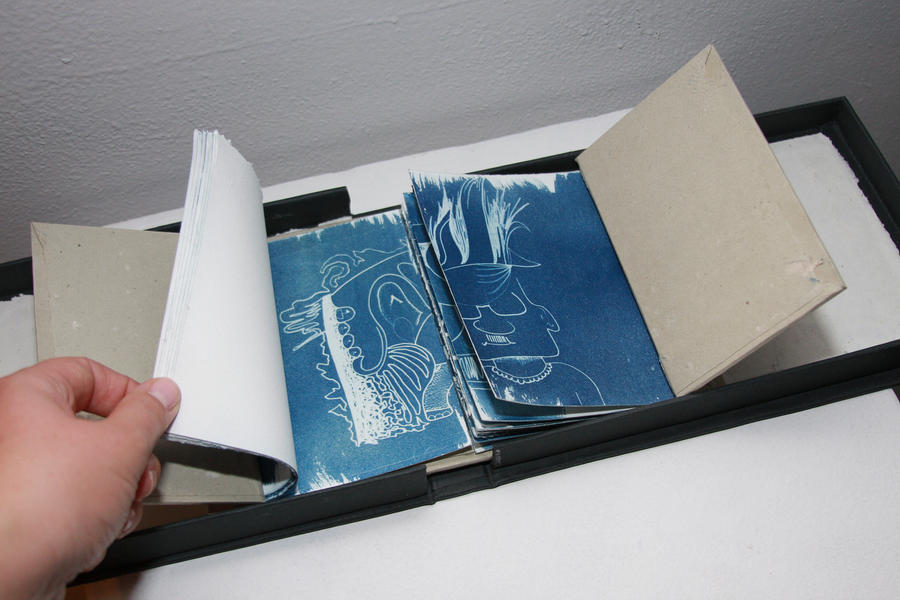
Compound bindings incorporate two or more binding types into one book. The most common of these compound bindings are the concertina binding, the dos-a-dos format and the French doors format.
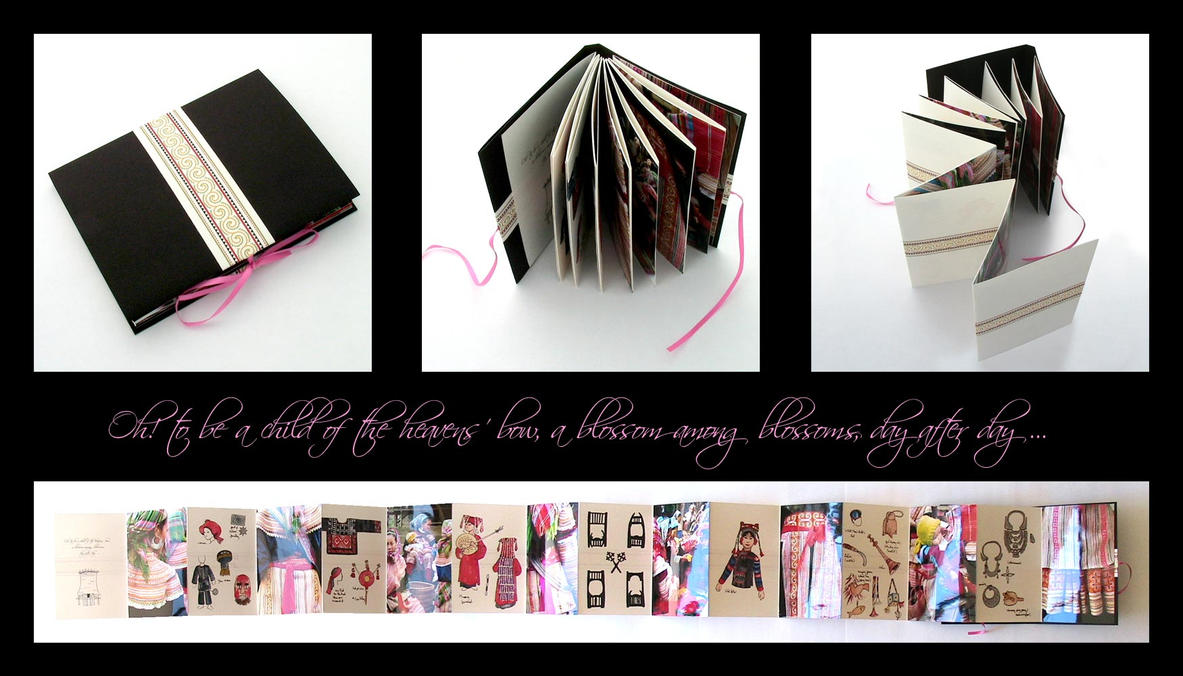
The Dos-à-dos format binds two separate books together, sharing one back-cover. Because the spine surfaces face away from each other, these two books can not be read at the same time.
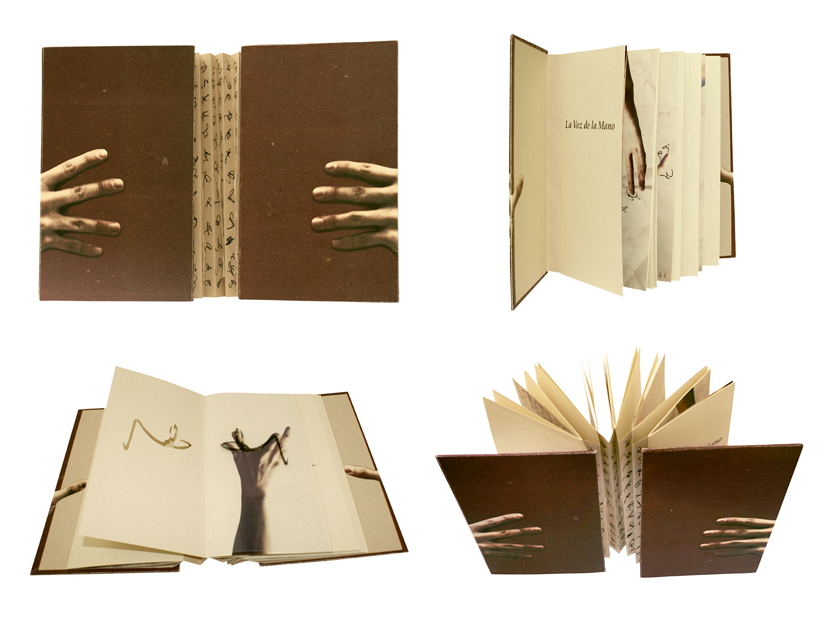
The French doors format also binds two separate books together, only this time, the books can be opened at the same time, much like opening facing balcony doors. The book on the right side would be paged through (comparing it to a normal latin book) from the back to the front.
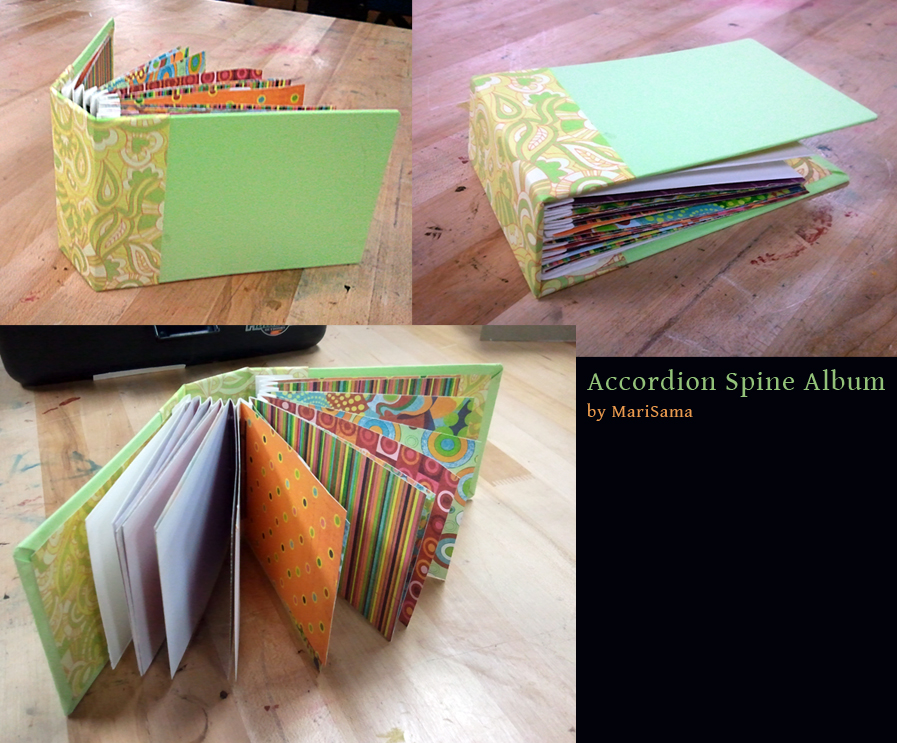
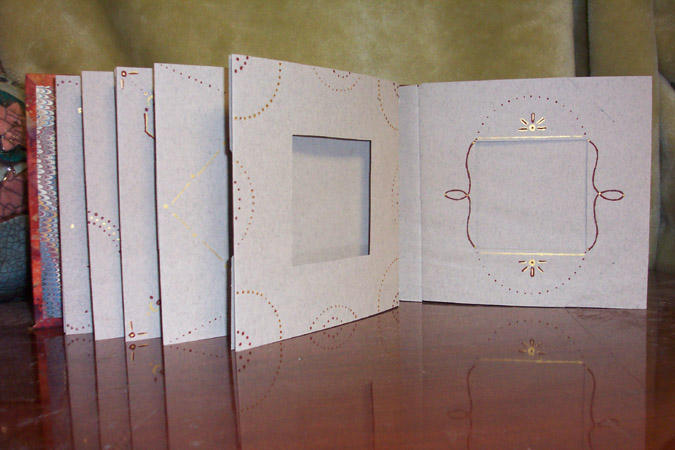
The Concertina binding is a compound binding where signatures of the book are sewn into the inside pleats of an accordion fold. The outside pleats of this fold may left to fan out, or may be sewn together using any of the stitches motioned above. The advantage of the Concertina binding is that it will open flat, even if the ‘signatures’ are made from thick materials, materials of varying thickness or are single sheets. The simplest Concertina (or Accordion) book is only a long strip of paper, folded into pages.
Tutorials:
- Dos à dos by Jennibellie, video
- Folding concertinas by Benjamin Elbel, video
- Accordion book by Grace Bonney, webpage
- Accordion fold spine by Cate Prato, webpage
Non-adhesive bindings #8: Rare bindings
- Japanese Retchoso Binding (Multisection Journal), where two threads cross over each other inside the section and when they exit, go into the next section without making any kind of knots.
Tutorials:
- Retchoso Book Binding by HJD-GalaktikGraphiks, deviantART tutorial
- Japanese Multisection Journal by gatzbcn, webpage
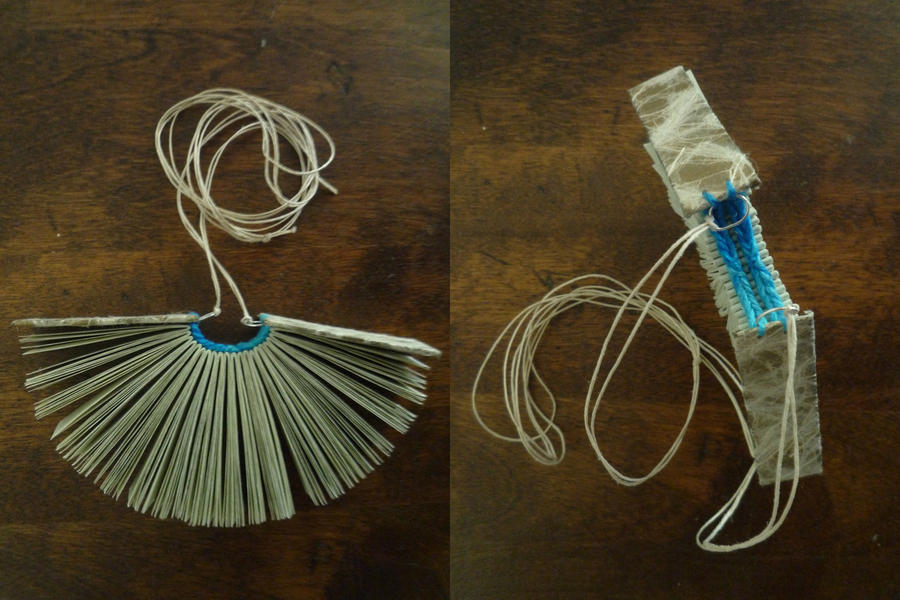
Non-adhesive bindings #9: Contemporary single sheet sewings
In the past decade, several sewing methodes have been developed to bind together single sheets of thicker material. What they all have in common, is that they all have pierced holes at the spine side. These holes, however, are not binding holes like in signature sewings. The actual sewing happens in the hinges between the sheets, making the holes in the sheets merely places for the thread to loop through. Because the hinges are between the sheets, these books can open flat.
Tutorials:
If you’re interested in these kind of sewings I highly recommend Keith A. Smiith’s Sewing Single Sheets, Volume 4 of his Non-Adhesive Binding series.
Adhesive bindings
Adhesive binding #1: Perfect bindings (or paperbacks, soft-cover books, rubber-back binding, double-fan binding)
A book bound with a perfect binding is a stack of papers hot-glued on one side. The cover is then folded around the stack and the glue is re-heated to make it stick to the spine. In some cases several slots are carved out of the spine surface to create a stronger bond. Perfect bindings are usually created by machines, however they can be made by hand using regular bookbinding glue by bending the stack of papers at the spine side in a way that a millimeter of every paper is exposed, glue the exposed surfaces and then bending it the other way and repeating the process. This is called ‘Double-fan binding’.
A paper backed book can also consist of sewn signatures instead of a stack of loose papers.
Tutorials:
There are a lot of tutorials on making paperback books by applying (hot) glue on a pressed stack of paper. In my experience, this won’t result in a long lasting binding but can be easy and convenient.
- Fun and easy paperback binding guide by Brad Isaac, webpage
- Fake/Hybrid perfect binding by georgeATM, webpage
- Perfect Binding DIY by Arounna Khounnoraj, webpage
- Perfect bound book block by Sage Reynolds, video
- Double Fan Binding for Single Sheets by wilauren, video
Adhesive binding #2: Bound on boards
A book that has cardboard (or any other thick material) covers but not a cardboard spine is ‘bound on boards’. The binding is done as a paperback binding with one exception, the book needs endpapers to attach the boards to the book block. The material that covers the spine is glued on the boards, covering it in its entirety or only an inch or so at the spine side. Sometimes the material that covers the spine is glued on the bottom of the board, if the board has a visual value.
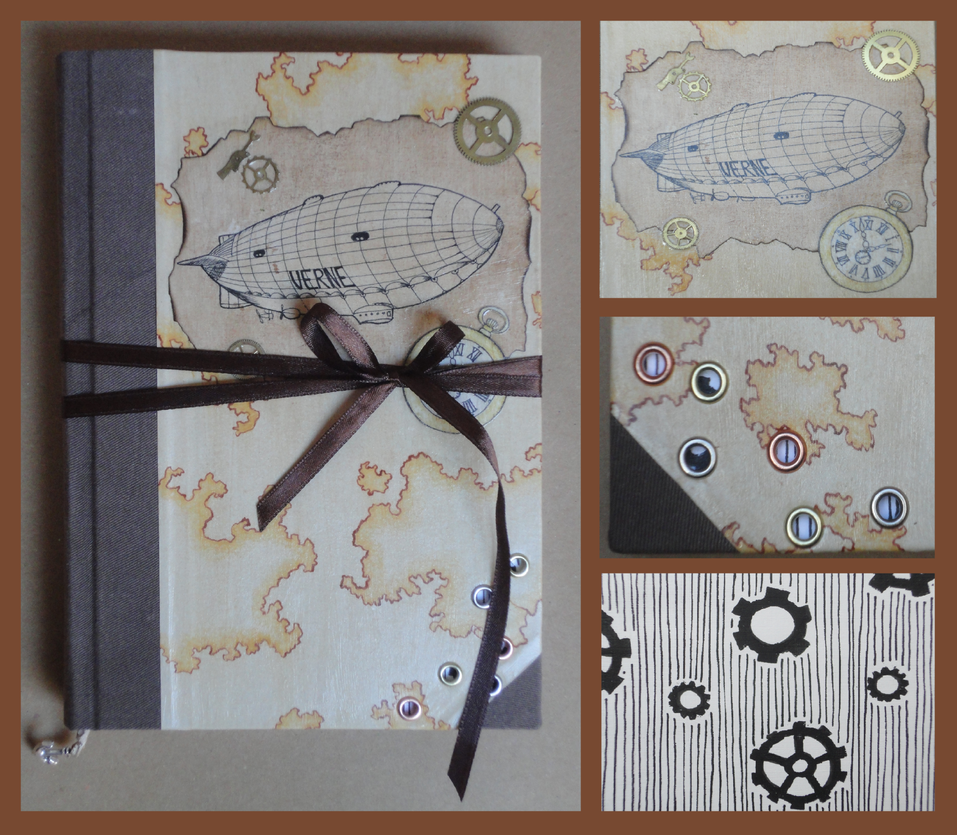
Adhesive binding #3: Case bindings (or case wrapped books, hardcover books)
This binding uses the word ‘case’ because the book block and the cover are created separately. The cover is then attached to the book block by ‘encasing it’. The book block is glued to the cover with its endpapers. The resulting books look very similar to the German bound books but are less durable. Case bindings are the go-to bindings for graphic industry as well as the hand bookbinder because they look very professional and are relatively easy to produce.
This is also the adhesive binding that gives you the most creative opportunities. The 4 bindings below, if created traditionally, have some very strict guidelines to follow. Case bindings, however, can be covered with paper, cloth, leather, etc. They can have either flat or round spines. They can have headbands, bookmarks, pockets in the back and closures. There isn’t any rule on how to bind the book block. Sometimes its sewn on tapes or ropes, sometimes its sewn with an unsupported stitch. You can read more on stitching methods in the non-adhesive binding section above.
Tutorials:
When you’re searching for bookbinding tutorials, chances are great you’ll end up with a tutorial on making a case binding. Some tutorials use only basic materials, and some explain how to use advanced machinery. I recommend looking through a few tutorials before settling on one. There are many variations on how to make corners, what measurements to use, sewing techniques, cover materials etc.
- Bookbind Tutorial by lenoki, deviantART tutorial
- Bookbinding Tutorial by JamesDarrow, deviantART tutorial
- Book Tutorial by Swashbookler, deviantART tutorial
- How to bind a book by IsBreaLiomCaife, deviantART tutorial
- The binding of Dogs of War by Marenne, deviantART tutorial
- Miniature Book Tutorial by trixi-b, deviantART tutorial
- Bookbinding by Peter Baumgartner, video
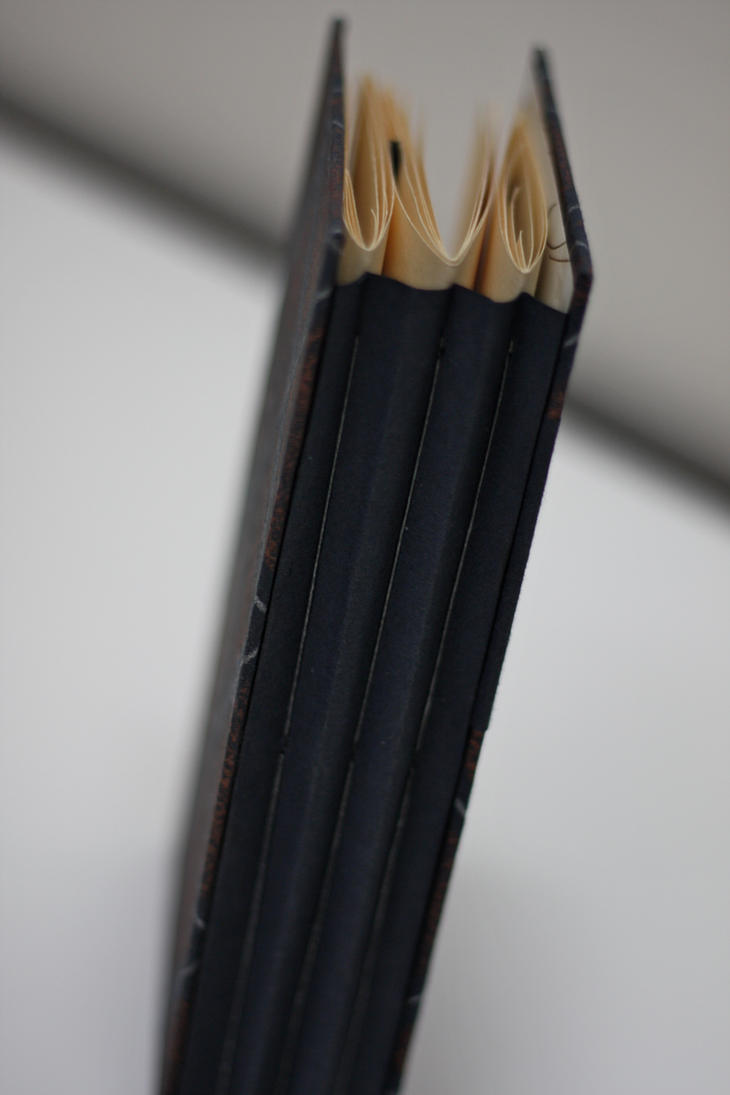
Adhesive binding #4: German bindings (or Bradel binding, Bonnet binding, Bristol Board binding)

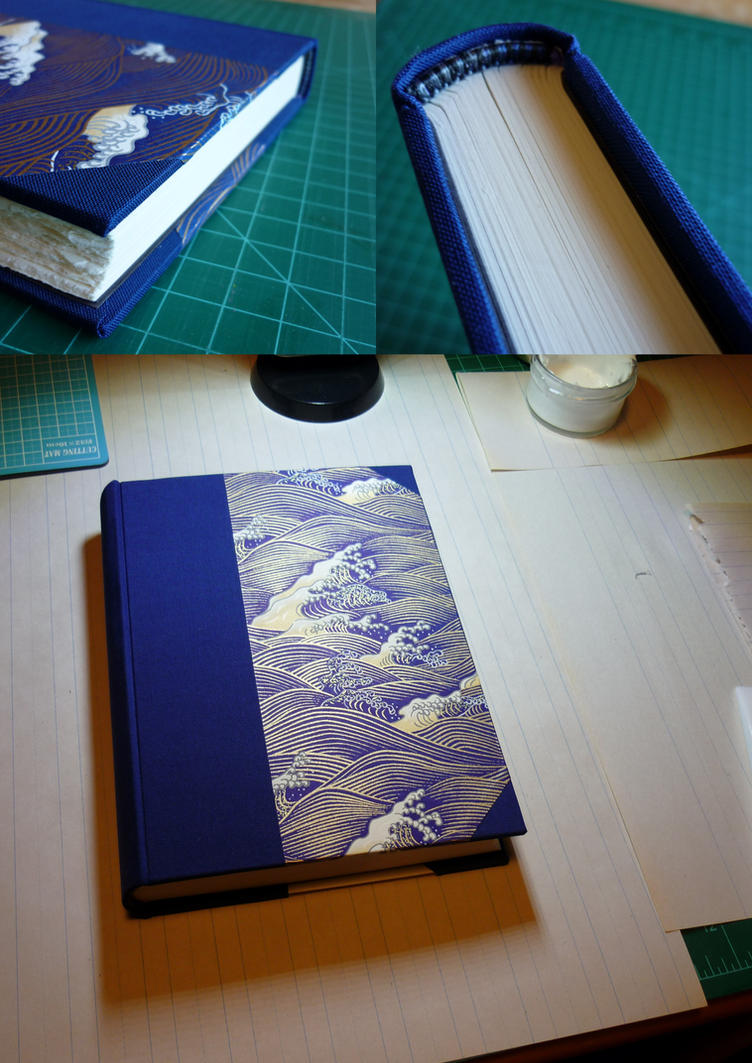
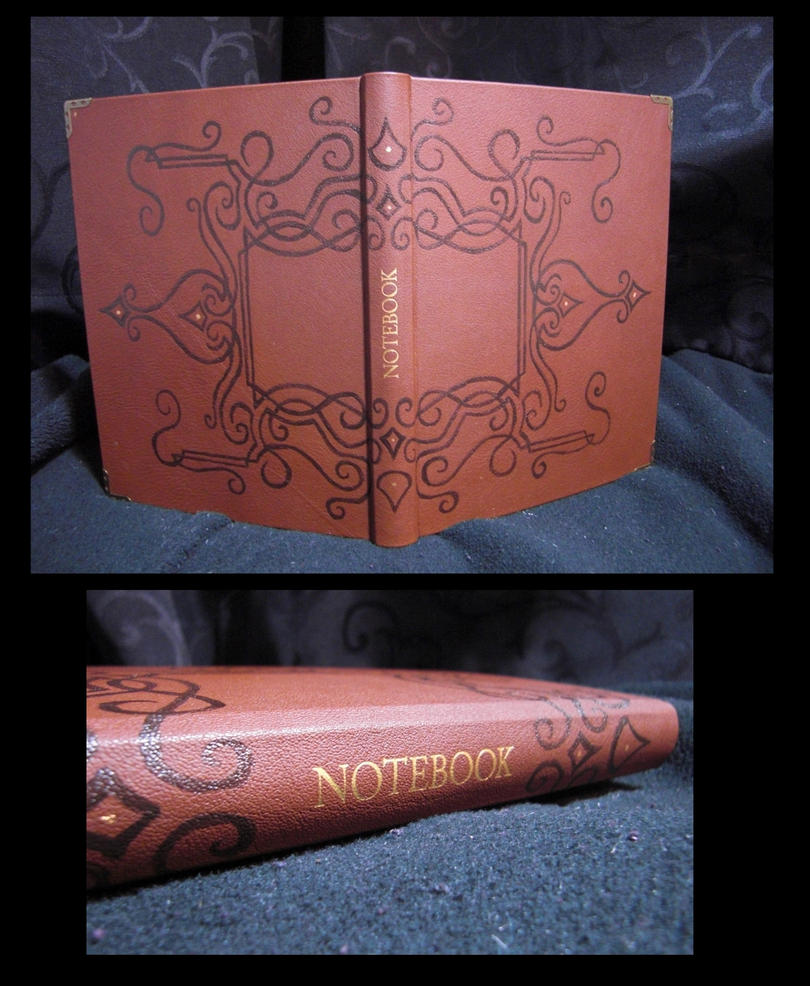
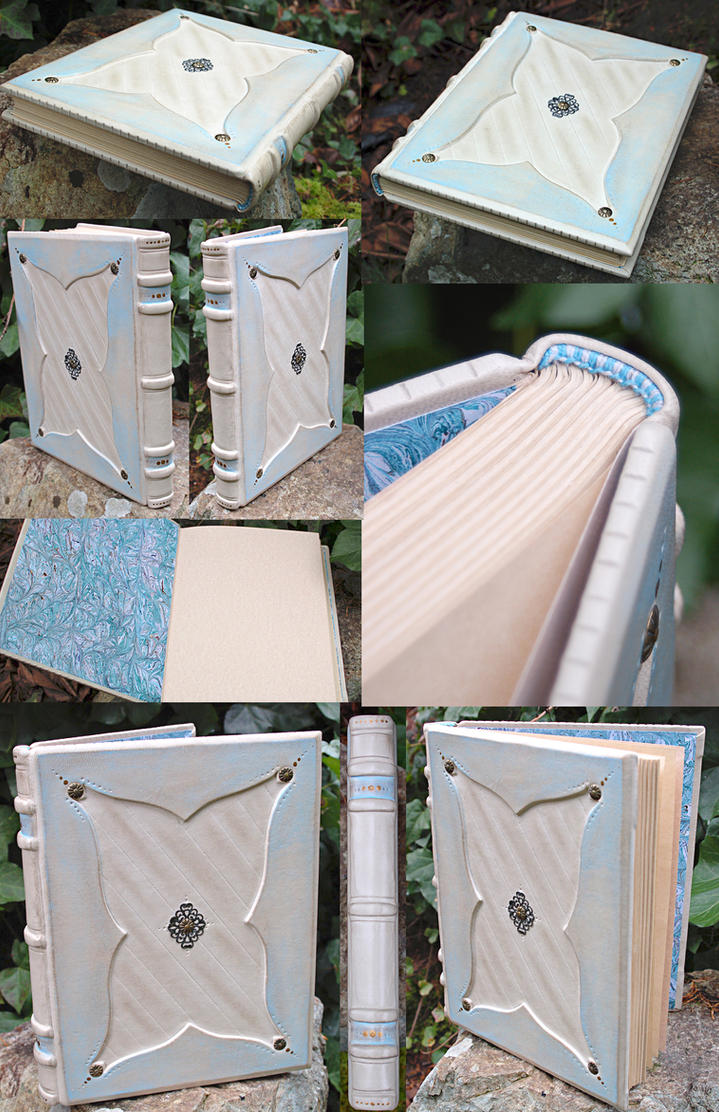
 The German bindings most identifying marks are the deep grooves along the hinges of the book. They look very similar to case bindings but are constructed in a completely different fashion. Instead of encasing the book block with the finished cover, the cover-material will be added when the boards are already attached to the book block. Traditionally, the book block will always be sewn on cords or bands and the spine will be rounded. Traditional cover materials for this binding are cloth, imitation leather, parchment and luxury paper.
Tutorials:
- German Case (Bradel) Binding by Peter D. Verheyen, webpage
- Bradel Binding by Jana Pullman, webpage
- The basic bind of books by Jamie Butler, webpage
- Curso de Encuadernación Bradel by Eduardo Tarrico, Spanish video
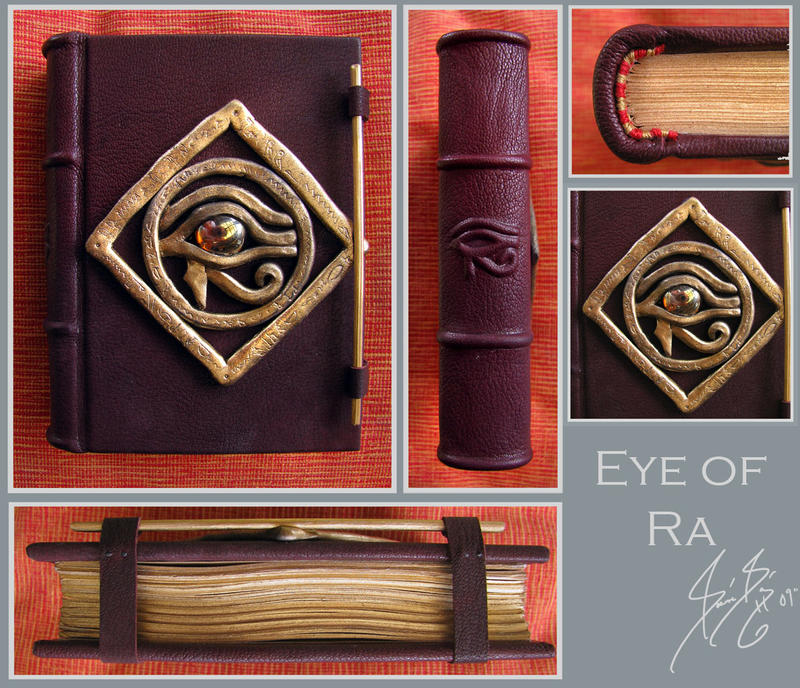
Adhesive binding #5: French bindings

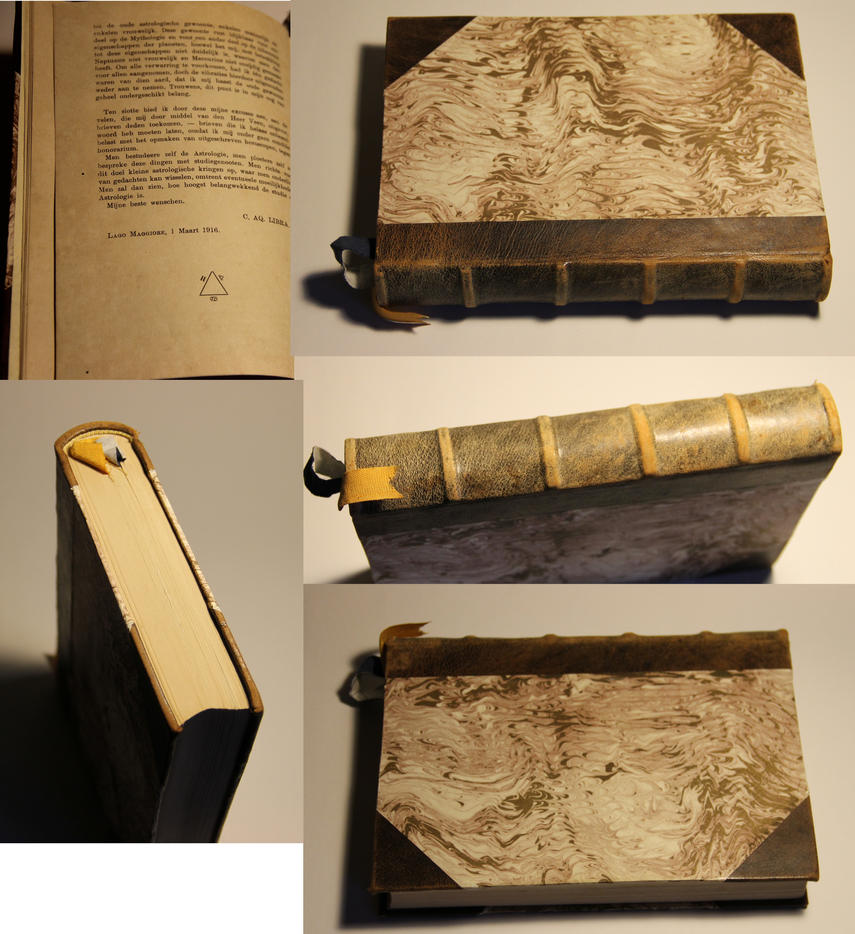
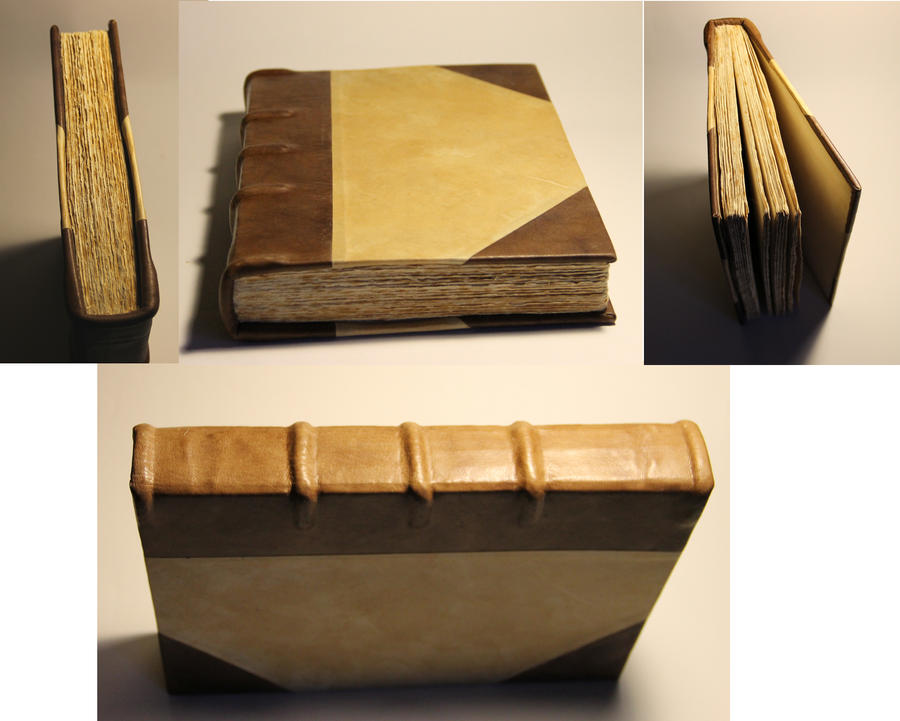
 The French binding’s characteristic is the hinge on the outside of the book. In contrast to the German binding, there won’t be any visible grooves at the hinges of a French binding because the boards are positioned tightly against the shoulder of the book (this is a fold in the signatures that can be created when the spine is rounded). Traditional French bindings will always be bound on ropes. They are covered with either leather or parchment (fully or only the corners and spine) and the spines are either smooth or enriched with fake ribs.
Tutorials:
I haven’t yet found any online tutorials on French bindings.
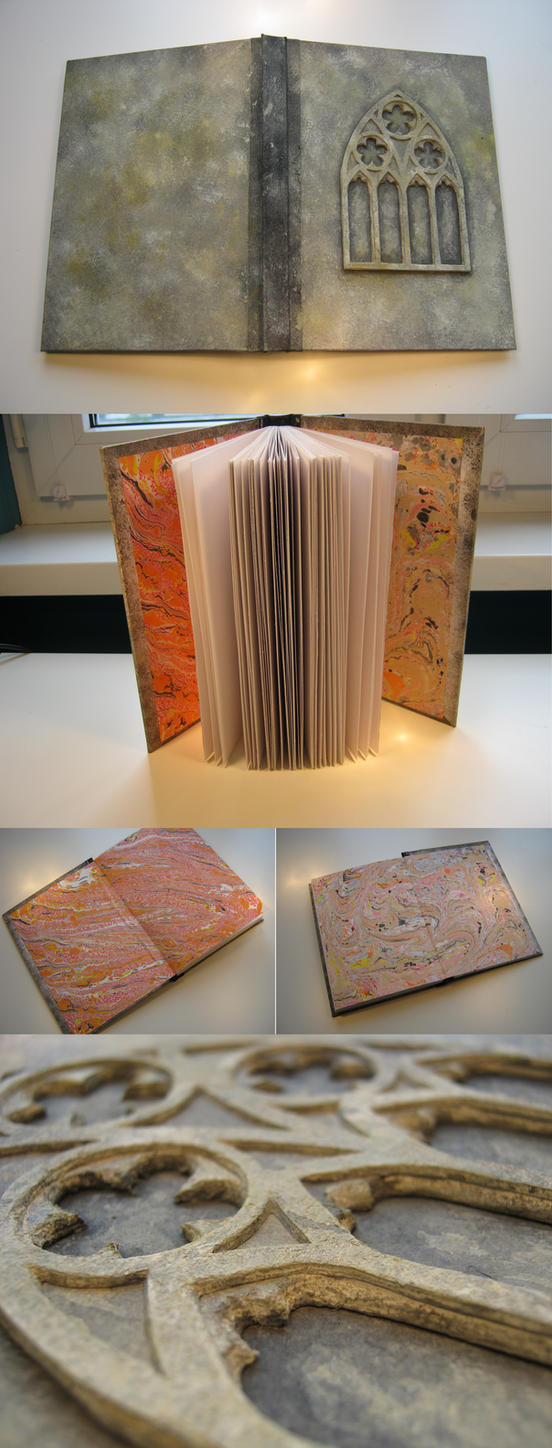
Adhesive binding #6: English bindings (or Classic binding, Gothic binding, Medieval binding, Renaissance binding)
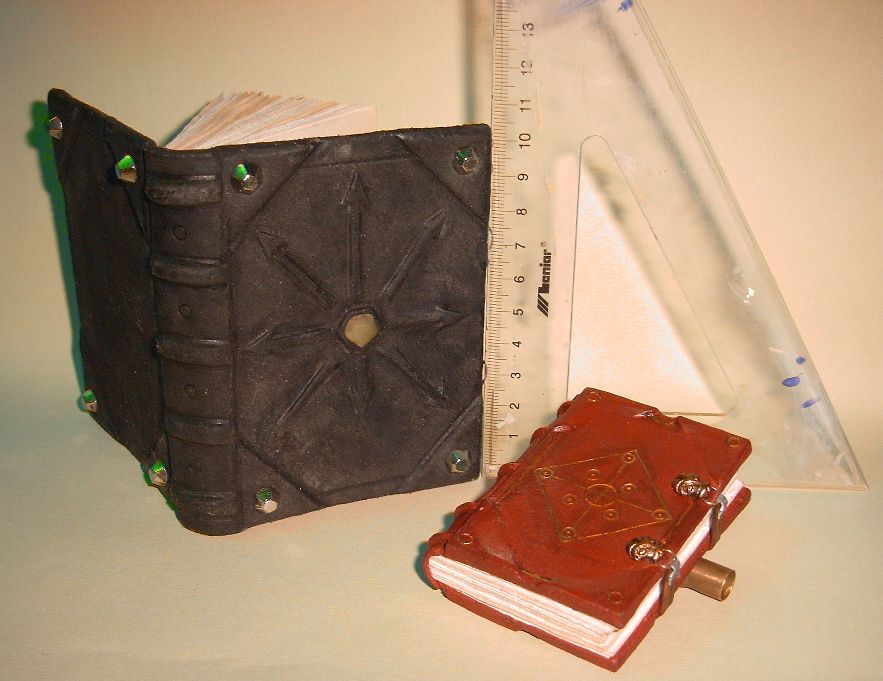
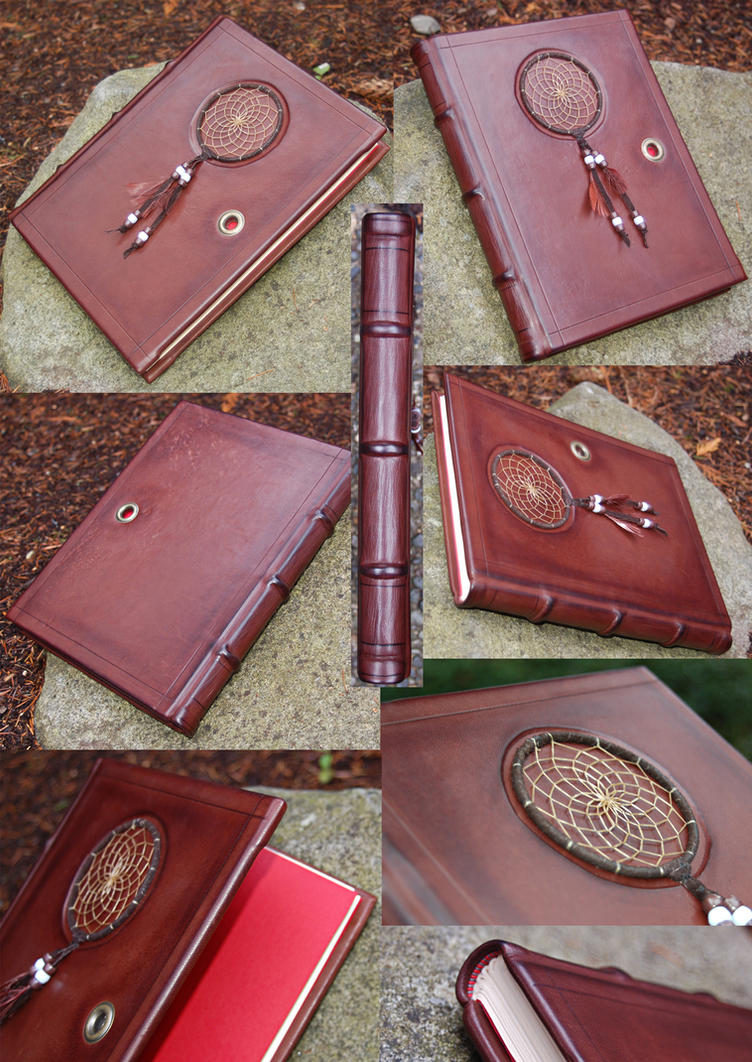


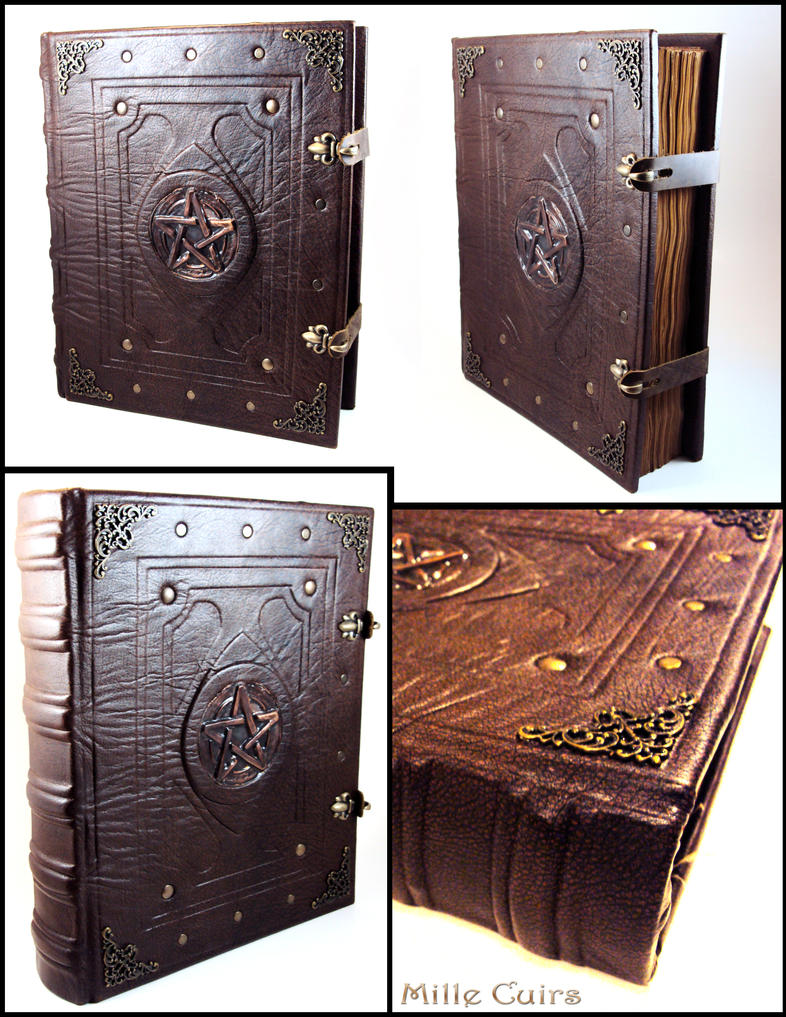
 The English bindings most identifying marks are the real ribs on the spines, created by the thick ropes the signatures are sewn on. Just like the French binding, the English binding has no grooves at the hinges of the book. The ropes that hold the signatures together are woven through the thick cardboard (sometimes even wood) covers. This technique is really sturdy, as can be proven by many surviving monastery bibles still to be seen in musea and special libraries. If you’re planning on making really thick and heavy books, this is the way to go. The traditional English binding will only be covered in leather or parchment.
Tutorials:
- Standard Leather Bound Book Construction by BCcreativity, deviantART tutorial
- Text Block Construction by BCcreativity, deviantART tutorial
- Advanced Gothic Binding by Kristen Kirk VanTassle, webpage
- Early Gothic Binding by Erin Clupp, webpage
- Traditional Bookbinding Techniques by John Martens, video
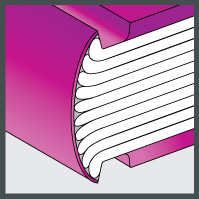
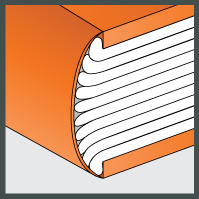
Adhesive binding #7: Springback bindings (or Ledger binding)
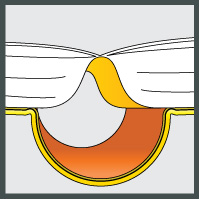

 The thing that makes a springback binding different from other adhesive bindings is the fact that when the book is opened, the spine of the book block will spring up, creating a gap between the enforced rounded spine of the book and the spine of the book block. The book, when opened, will lay perfectly flat. The hinges of these books will be farther away from the spines than those of other adhesive books. The basic bookbinding instructions are not very different from French or German binding, except where the spine is involved.
Tutorials:
- The Springback – Account Bookbinding by Peter D. Verheyen, PDF
- Springback Account Bookbinding by Peter Verheyen, webpage
- Opening and Closing a Springback Book, by Rhonda Miller, video
Adhesive binding #8: Overcast block sewing (or Whip stitch)


 This sewing method is perfect when you have a stack of printed pages that need to become a normal book that can open flat down the middle and you think using only glue on the spine won’t do. First, a thin layer of glue is applied to the spine side of the stack of papers. Next, a row of holes is drilled about 5 millimeters away from the spine of the books. ‘Signatures’ are then created by cutting off stacks of 6 to 10 pages. These signatures are then sewn together with a whip stitch. This process is extremely time-consuming but is the best way to create flexible book blocks from single sheets by sewing.
Tutorials:
Suscribirse a:
Entradas (Atom)