domingo, 16 de junio de 2013

Secret Belgian Binding


Today my post is dedicated to Secret Belgian binding.


This type of bookbinding is very recent, specially comparing to other techniques of bookbinding. It was invented in the mid 1980s by Anne Goy. Her goal was to make an occidental version of the Japanese bookbinding that could open flat.   

The panel consists of three parts: two covers and the spine that are sewn together. The signatures will be sewn to the threads that cross the interior part of the spine.  


This type of bookbinding is very comfortable; it not only opens flat, but there is also no limit in the number of pages or the size (unlike, for example, the Japanese bookbinding that can be difficult and uncomfortable to open if it's very small). Moreover, since the union of the panel is made by thread, we can use paper to cover it all and we don't have to be afraid that this paper, as time goes by, will break and our covers will be separated from the spine.


Encuadernación belga secreta


Hoy os voy a presentar la encuadernación belga secreta. Este tipo de encuadernación es muy reciente, especialmente en comparación con el resto de técnicas de encuadernación. Fue inventada a mediados de los 80 por Anne Goy. Su objetivo era crear una versión occidental de la encuadernación japonesa, pero que se pudiera abrir completamente.

La cartera consta de tres partes: dos tapas y un lomo que se cosen entre sí. Los cuadernillos irán cosidos a los hilos que cruzan el lomo por la parte interior.


Es un tipo de encuadernación muy cómoda; no sólo se abre completamente, sino que no hay límite de número de hojas o de tamaño (a diferencia, por ejemplo, de la encuadernación japonesa que, si es muy pequeña, presenta dificultades para abrir y es incómoda). Además, como la unión de la cartera es mediante hilos, podemos utilizar papel para recubrir completamente las tapas y no tener miedo a que este papel, con el tiempo, se rompa y nos queden las tapas separadas del lomo. 


miércoles, 12 de junio de 2013

Papel marmoleado

Durante la última semana he estado marmoleando papel. Sí, ¡por una semana entera! Aquellos que saben cómo se marmolea saben que la preparación del papel y del baño requiere de tiempo (y reposo).

La primera vez que marmoleé fue durante un curso de tres días en abril, peró ésta fue mi primera vez marmoleando en casa, con mi novio (que nunca había marmoleado anteriormente). 

¡Tengo tantos papeles marmoleados ahora! Tengo la intención de usarlos en encuadernaciones, como papel de portada o papel de guarda. Sin embargo, como tengo tantos, también tengo la intención de venderlos online. 

Esos son algunos de los materiales que usamos. Cada uno de estos botes de vidrio fue llenado con un color de pintura gouache, mezclado con agua destilada y hiel de buey. Cada uno tenía su cuentagotas para asegurarnos que no mezclaríamos los colores. También se puede apreciar el baño con agua destilada y carragenina (un tipo de alga) y, más al fondo, los peines para hacer las bellas formas típicas del papel marmoleado.
Probando el color rojo en el baño.
Algunas imágenes de los colores en el baño y el momento de peinarlos.


¡Finalmente, algunos de los resultados!


Espero que os gustaran las imágenes. Varias personas me han pedido que haga un tutorial de papel marmoleado, así que es probable que de eso trate mi próximo post.

¡Saludos!


Marbled paper

For the last week I have been marbling paper. Yes, for a whole week! Those of you who know how to marble know the preparation of the paper and of the bath takes time.

The first time I had marbled was during a three-day course in April, but this was my first time marbling at home, with my boyfriend (who had never marbled before).

I have made so many marbled papers now!! I intend to do some bookbinding with them. I will use them as a cover or as endsheets. However, since there are so many, I also intend to sell them online.

These are some of the materials we used. Each of these glass bottles was filled with one color of gouache, mixed with distilled water and ox gall. Each one had a dropper, just to make sure we didn't mix the colors. You can also see the tray with the bath of distilled water and carrageenan (a seaweed) and, beyond, the combs to make all the beautiful forms typical from marbled paper.
Trying the color red on the bath.
Some images of the colors on the bath and combing them:


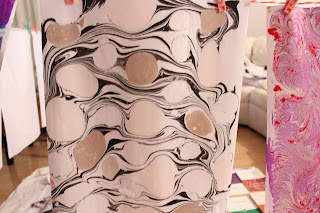
Finally, some of the results!


I hope you like the pictures! Many people have been asking me to upload a tutorial on marbling paper, so that is probably what my next post will be about.


Have a nice week!